News
New Releases 20mm Buildings and Battlegroup token set. June 30, 2015 06:55
My plastic and thin plywood order has arrived! I can now offer for sale the 20mm scale "La Brasserie" together with a 20mm version of the very popular "Dormer House 2". The dormer house 2 can be used for WW2, the Franco Prussian war and even Napoleonics. The thin plywood was worth waiting for and I am pleased that the shutters look more "in scale" than some of the offerings made by other 20mm scale manufacturers.
To run alongside the 20mm collection of buildings (which will be added to) is a token set for "Battlegroup". The set of tokens replaces the card tokens that come with the book and has additional tokens to aid gameplay.
I have produced the "Air Attack" token as an outline not a fully shaded silhouette. This means that when selecting tokens from the bag......you cannot feel for THAT token!
If you click onto the new releases sections further details and additional pictures can be found on each of these products.
I am busy cutting copies of the 20mm buildings and new token sets in readiness for Battlegroup South's show at Bovington next weekend.


|
In the picture above, on the left is the 28mm version and on the right, 20mm showing comparative sizes.
|

|
The 20mm unpainted model has 4mm plastic tube supplied with the kit for chimney pots. Also provided is the plastic angle piece for the capping tiles, so it really does have the same quality as the big sister.
|

On the workbech: "La Brasserie" coming soon in 20mm 1/72 scale June 23, 2015 12:05
|
Coming soon to the Charlie Foxtrot Models range of buildings is a 20mm 1/72 scale version of "La Brasserie". The little version has a 116mm x 82mm footprint and stands 152mm high. Plastic strip for ridge tiles and plastic tube will be included in this new kit, just like the "big sister" version. Please watch this space for when the model becomes available. The picture is of my final prototype and copies are being cut as I type. I am waiting on my supplier for thinner plastic pipe for the chimney to reflect the smaller scale model. This kit will be ready in time for the forthcoming Bovington show. This addition to my range is in response to the gamers who spoke to me at both Exeter and Weymouth shows requesting 20mm buildings for both Bolt Action and Battlegroup. Further kits are planned and will be released over the coming months. If you have good eyesight and noticed that the 20mm model stuck to a 1p coin is an Italian, please accept my apologies. If you did not notice this; please disregard this last paragraph. |


New Release: Sci-FI "Perimeter Fence" June 13, 2015 14:35
A new addition to the Charlie Foxtrot Models Sci-Fi range is now available in the webstore.
The unique "daisy wheel" construction of the supporting columns means you can slot fence sections together in a variety of ways to make your table-top mining encampment or military outpost.
Six 150mm fences, two moveable 75mm gates, 2 gate connectors and two additional support columns are included in the set. The Sci-Fi collection is growing!
Painted miniatures are produced by Games Workshop, all other models already appear in the Charlie Foxtort Models shop.


Wargames Show : Bournemouth June 5, 2015 11:05
At Fisticuffs in Weymouth last weekend, I met Peter Valinski and the guys from "Entoytainment".
They are putting on a new wargames show in Bournemouth titled: "Beachhead"
Charlie Foxtrot Models will be attending...the date for your diaries is Saturday 20th Feb 2016
Great news to have another show to attend in the South!
New Release: Shops "Back Yards" June 2, 2015 11:58
This week, Charlie Foxtrot Models are releasing three back yards for the row of French style shops.
I designed the models for the Plymouth Association of Wargamers show Bolt Action demonstration game which took place last February. Due to the many requests from that show and Exeter Legionary, I have now included them in my product range.
The back yards have been designed to fit "Le Brasserie", "Le Boulangerie" & "Tabac".
The yards increase the shops footprint and add an extra level of realism. Each back yard is large enough to have a Charlie Foxtrot "outside W/C". With walls at 33mm high, they block line of sight. party fences however can be fired over.
Once placed in a row, the back yards "line up" so you can place them next to a straight back lane or road.
Each of the back yards come with optional 2 side walls or fences, so you can use them with the shop as a "stand alone" rather than in the row of terrace shops as pictured.


Cry Havoc and Let Slip the Dogs of War! June 1, 2015 18:34
I have been following Ron Carnegie's blog on wargaming in Virginia. I first found out about his blog after he bought some Charlie Foxtrot Models from me before I opened the webstore. I was delighted to see the following review of Charlie Foxtrot Models.
If you have not bought a Charlie Foxtrot Model before, please read what an existing, independent customer has to say.
https://cryhavocwardogs.wordpress.com
I would also recommend you follow this blog from across the pond....makes for a great read.
New Release: Terrace Front Yard (Plain wall version) May 27, 2015 14:24
As shown in my step to step "Table Edge Terrace" tutorial, I am now releasing the front yard with plain walls. This version differs from the red brick version, being smooth walled and having a different fence.
This model is designed to fit against both British and French versions of "The Terrace" and the "Table Edge Terrace".


New Release : "Stables" May 23, 2015 16:32
The "Stables" model is available now on the onlineshop. Ideal for WW2, VBCW or modern wargaming.
I had been working on this model for some time; having been given a unit of SS cavalry for my birthday spurred me on to finish the model.


I sprayed the flagstoned floor before assembly, then sprayed the outside grey. A light white spray, followed by a brown wash finished the walls. Total time to make and paint: 4 hours. A personal record for me!
This model was designed to fit in the "Stone barn" space of the "Farm Tile" however it would look equally as good in a field with the "Farmhouse" nearby.
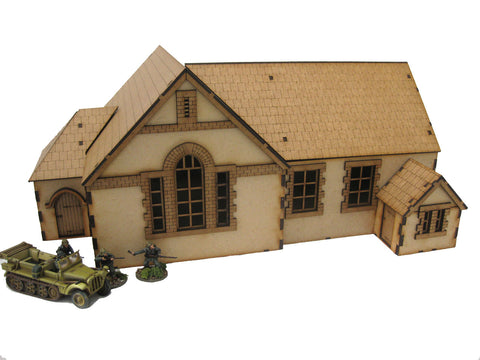
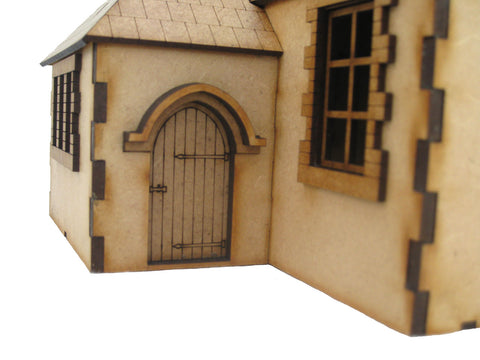
New Release: "L'Ecole" school May 17, 2015 18:49
My latest design is now available in the on-line shop.

I went with L'Ecole to compliment my French range of buildings yet, this building could be pressed into service as a church, town hall, funeral parlour or chapel of rest. I have completed the packaging, recieved a supply of half round plastic strip for the capping tiles and uploaded lots of pictures into the new page on this site titled "Instructions". Please visit the Instructions Page and see how easy it is to construct this kit! A full 370mm x 255mm footprint makes this a real centre piece to any urban / village set up.
On the Workbench: School, Church, Chapel of Rest, Civic Building May 12, 2015 21:05
I have just completed a new kit. This project started on the day I opened my webstore www.charliefoxtrotmodels.com. I took a lot of pictures of this building which I found really interesting. I have spent many hours since, drawing and developing my prototype of the kit. All I need to do is complete the packaging and cut some stock, prior to release.

This building was originally a village primary school yet could easily be a church, chapel of rest or town hall. I originally was going to run with the title "L'Ecole" to further my WW2 Europe collection. Having made the model I feel it has great potential in Bolt Action, "A Very British Civil War" , alternative history and Dad's Army themed games. The Warlord Games Germans and Army Group North SDKFZ/10 give an indication of size......this kit is HUGE!

Breaking away from how I usually present my model kits (with printed instructions), I have taken step-by-step assembly pictures which would be posted on this site for reference.
I would be grateful for ideas on how I should name this multi-use kit and if you think on-line instructions are preferable to paper copies.
Colin
Guest Tutorial: "Sea Effects" by Ted Martin May 8, 2015 19:34
I was so impressed with Ted's sea effect from the pictures he submitted for the customer gallery, that I just had to ask how it was done. Ted kindly offered to do a step by step tutorial as he kept the pictures as he went along. Even if you have no immediate plans to do a beach landing, you really have to admire the skill and end result ...feast your eyes on this:
SEASCAPES
Colin produces some of the best war-games buildings available on the market today. I recently submitted some photographs for the customer gallery. Colin was interested in finding out how I had produced the beach landing scene and has asked me to provide a short tutorial. I have broken the process down into the following steps:-
1. RESEARCH
In my opinion this is the key aspect to our hobby. We have all seen fantastically detailed war-game armies displayed on the table. Large amounts of research has been undertaken to get the kit and uniform details absolutely spot on before the first dob of paint hits the figure. If we are going to put all this effort into painting our miniature warriors and the buildings that they fight over, then it is only fitting that we deploy them in correspondingly accurate terrain.
The Sea is a dynamic environment and is subject to a multitude of variables such as time, weather, sunlight etc. A beach on a spring morning will be remarkably different from an Autumn afternoon. Just like a photograph our war game terrain will be a snapshot in time. Its important that you study the environment that you wish to recreate. The sea is not always blue. It can range from various greys and greens. The colour varies with depth and wave heights vary with the wind. Its important that you pick a moment in time to model your masterpiece. If you don't have the sea nearby then the internet holds thousands of photos that can be used for inspiration. Follow the advice of Leonardo Da Vinci “Let nature be your teacher”
2. BASEBOARD
Our war game club uses a modular system so that different tiles can be fitted together on our nine foot by five foot table. Construction is on MDF or ply board with polystyrene insulation board, hot wire cut, to represent hills and gullies etc.
3. BASIC PAINT JOB
I used acrylic tube paint available from art stores. Four basic colours white, blue, green and black. Darken the blue to start painting the sea furthest from the beach. Then in blended bands start lightening the colour as it nears the beach. Add in stippled shades of green into the mid band to add depth and variation.


The contact point between the water and the land will have the largest amount of turbulence. So this needs to represent foam and churning bubbles. Later on in the process we will be using PVA. This dries clear and the underlying colours will show through into the solid PVA. Waves are formed by a combination of wind and the rising level of the beach. You will see that I have stippled light blue onto the flat board to represent the waves. This will show through the PVA to give an impression of depth.
4. PRACTICE & EXPERIMENT
As the Military say “ Prior Planning and Preparation Prevents Pretty Poor Performance”. Get some small ply or mdf off cuts and practice the above technique until you get the impression that you want. These practice boards can be used again when we practice the PVA overlay techniques.
5. TOOLS & EQUIPMENT
1.Thick PVA such as Liquitex or Mod Podge.
2.Palette Knife.
3.Flat one inch paint brush
4.Cut down round stipple brush or an old round paint brush that you are about to throw away
5.Medium spoon. Kitchen desert spoon works well but don't tell the wife!
6. Tube of clear silicon sealer that is normally used as a bathroom caulking. Ensure that it is the type that says clear or translucent. I have tried different types they all do a similar job so go for the cheapest.
6. PVA WATER BASE

Use the thick PVA for this part. I tried both Liquitex and Mod Podge and they did a similar job. Liquitex is slightly better as it drys gloss. Both are available from art shops or on line. Use the palate knife to spread a thin layer ( 2 to 4 mm) across a section of your sea base board. Its best to do this in small sections say 20cm by 20 cm. Then take the spoon and tap it up and down on the spread PVA in a stippling motion. This will raise the PVA into small peaks. Experiment on your practice boards first before moving onto the main board
Start out at sea and move towards the beach. You need to let this dry for a couple of days. It will be white when you first lay it down but will slowly dry clear. Some thicker parts may remain white if the atmosphere is damp. If you are really impatient then the wife's hair dryer can be put to good use but this normally requires a clandestine operation to obtain it.


7. WAVES
Use the bathroom caulking best applied in lines with a caulking gun. place the lines of silicon over the white stippled pre painted sections of the baseboard. Use the one inch broad brush and drag the top of the silicon line backwards from the direction of the beach. This will give you a wave front with a trailing edge. Don't worry if you get brush stroke marks as when dry this adds to the illusion of movement. gently stipple the top of the wave with the cut down stipple brush. Once again use your practice boards until you get the desired effect. Vary your brush application to test out different techniques.
HIGHLIGHT
Use the one inch flat brush and with a very small amount of white paint dry brush the top of the waves. This is best done after the board gas dried for at least a week. The Silicone will be naturally white until it finally dries clear. Dont over do the highlight. At the waters edge use the stippling brush and white highlight to give the foam and bubbles effect.
8. VARNISH
The PVA becomes clear by evaporation of the carrier medium. Observe the board over a number of days. The deeper whiteness gradually disappears however there comes a time when the balance between clear and white PVE gives a good impression of depth. If you want to stop the evaporation at that critical stage then spray the whole seascape with an acrylic gloss varnish. Once again available at good art stores or on line. Dont use enamel spray as you may get a reaction between the PVA and the varnish. Once again use your practice boards as a tester.
10.ENJOY THE VIEW
The acrylic has proved to be remarkably robust. We have had no cracking or lifting. It only requires a wipe over with a damp cloth now and again to prevent dust from dulling the varnish. Many of our mini warriors have got their feet wet over this particular game tile and it has stood the test of time. If you have any specific questions on this technique then please contact me at tedmartin21@me.com. Happy gaming.

Ted, thank you for sharing this with Charlie Foxtrot blog readers.
New Release: "Dial Counters" Pin markers, gaming aid May 6, 2015 11:49
The "Dial Counters" 5 piece set, are laser cut MDF and require assembly.
The "Dial Counters" were designed to act as pin markers or "push & shove" counters. The 40mm diameter gives plenty of scope for modelling wounded / deceased or any appropriate diorama for your chosen game system.
The counters have numbers 1 to 9 and are less likely to be picked up and rolled than marker dice.
The pictured " Black Tree" models have been painted by Paul Buller (Westwind also do some excellent WWII casualties)
