News
New Release: Sword & Spear gaming aid 60mm May 6, 2015 11:22
After floating this on the Sword & Spear forum, feedback was very positive. I asked which MU would be best for gaming S&S with 28mm miniaures. The consensus was 60mm. So here it is, a "Sword & Spear Data Stick and token set for this scale. I would also take this opportunity to point out that, due to popular demand, I have doubled the amout of wound tokens. I must have underestimated the amount of hack 'n' slash.
I have also revised the 40mm set to include the additional tokens.


Exeter Legionary May 5, 2015 12:04
I really enjoyed the Exeter show, such a spacious venue, easy and free parking, relaxed atmosphere, good cafe....and best of all demonstration games to rival that of SALUTE. My only gripe was that there were no tournaments taking place. I do like to see competition armies composition, painting skills and styles and of course, pick up on strategic hints and tips from participating entrants. With that said, there was still loads to see...here are a few pictures I took on the day. Sorry if I took pictures which do not appear here, the lighting was just a bit too low for "regular" photography and my flash just bleaches out all the colour......apologies if I did not catch your details but I could not leave Mrs Foxtrot holding the fort on her own for long as it was far too busy.

The first picture shows my good mate Ron Leacy playing on the Charlie Foxtrot Models demo table. Here Ron looks really happy that his artillery bombardment on the first turn, after a few freaky dice rolls, knocked out his own Sherman. What a good sport! More on this table later.....just check out the range of scales & periods...

A real visual feast, I wish more of my pictures were of this quality to share.


The above 2 pictures are of another Bolt Action demo...looking very different ...the explosions look so realistic.....I will be making some of them soon. Apologies to the chap who put this game on was so open with his modelling ideas and I did not catch his name.


The above 2 pictures were taken mid battle from Rob Broom's impressive War & Conquest demo table.


The detail in this 15mm game was outstanding. I was also drawn to the wonderful gaming mat, it worked so well in this scale.
And back to the Charlie Foxtrot Table....


Ron's flamethrower house hopped and flamed Paul's Germans in the open. The "Dice Gods" were not with Ron as the German unit was still there when I came to view the game again.
Thanks again to Ron Leacy & Paul Buller for putting on the demo, doing the set up and the careful pack up too! Cheers.
Exeter will definately be in my calendar next year. Thanks to the organisers, the show went really well.
New Release: "Farm Tile" April 29, 2015 17:43
The "Farm Tile" is the latest model off the production line.....it will provide an excellent centre piece to any table with opportunities for attack / defence.
This piece is quite a size and has a massive footprint. It will transform a collection of buildings placed on a green battle mat to something more spectacular. With walls low enough to provide hard cover it also has significant gaming possabilities.
The "Farm Tile" has been designed to fit a range of Charlie Foxtrot Models buildings, the full list is mentioned in the online shop. Further additions are planned for an alternative to the "Stone Barn" pictured. Please come back and check my progress on that.


Tutorial: Step by Step "Table Edge Terrace" Part 4: finishing touches April 29, 2015 16:35
If you have just opened this blog, you can check how I got to this stage by reading the first 3 tutorials.
Before I continue the thread, I am going to give an alternative roof painting technique. I am sure you are all familiar with drybrushing so I did a couple of examples. The roof painting method on tutorial 3 is time consuming compared to drybrushing. The first image below is grey paint drybrushed going downhill. This leaves a too uniform, flat effect. It would be improved by painting a dark colour first and drybrushing a lighter tome over.

This next image has been drybrushed going uphill "against the grain" of the roof tiles. With a dark undercoat and a paler drybrush over the card tiles 3D effect will be further enhanced.

The finishing touches are my favourite part as they bring the model together and means it is almost table ready.
With the paint on the roof and wall fully dry, I mixed water to brown wash and liberally daubed this on with a downward stroke, I used a large (very) brush and worked quickly. When this initial was was dry, I repeated the process using, this time a very watery mix of Vallejo Green Brown. This time I did not go so far up the walls, keeping the weathered look closer to ground level.
The windows were trimmed from the acetate using a pair of scissors. I then used PVA to glue the windows in place. I then finished painting the shutters and glued them into position. For the white, I sprayed grey and oversparayed white. For the grey, I sprayed grey and painted a paler tone of grey on top. For the black, I sprayed black and did a highlight with a charcoal grey. On the white and grey shutters, I picked out the metal bracket hinges with black before using contact adhesive to glue in place. PVA will do the job, but takes longer to dry.


The doors were sprayed like the windows and shutters. I then went in with a brush to highlight, leaving a line of shadow, showing the base coat.

The chimneys were painted black inside and given a couple of coats of Vallejo Terracotta to complete.

The last and very satistying step is to apply self adhesive moss. I try to imagine which way is north facing and stick the moss where is more likely to be damp.

The final image........right, now what is next to paint?

I have finished with 3 whole days to spare before Exeter Legionary......I cannot wait to see this model on a fully terrained table. Ron Leacy and Paul Buller who are gaming on the table this Saturday, both have superbly painted armies, it should be a real piece of eye-candy.
New Release: Sword & Spear gaming aid April 22, 2015 17:14
Having played a few games of Sword & Spear, I was immediately hooked and quickly invested in the rulebook. This week's release has been developed alongside professional painter Kev Shilito and in consultation with Mark Lewis the author of the rule book. I am please to say the Data Stick and gaming tokens have been approved and can be labelled as the "official" set.
If you have not tried Sword & Spear, invest in a copy, it comes highly recommended!
It is fast play and makes you think throughout without getting bogged down in superflous detail. There is very little reference needed to the book ...if you have the Data Stick handy.
I did say to myself "no new projects, no new armies" and here I am planning a 15mm ancients army.
40mm x 15mm and 40mm x 30mm bases in both 2mm and 3mm are also available in the shop.


Tutorial: Step by Step "Table Edge Terrace" Part 3 April 22, 2015 09:15
If you have just opened this blog, you can check how I got to this stage by reading the first 2 tutorials.

| Once the paint was fully dried I used an "Asphalt" coloured emulsion tester pot to block colour the roof. This was applied quickly using a large brush with a smaller brush used to cut in by the chimneys and dormers. I used 2 coats to cover the card tiles. |

|
|
In this picture I have used the asphalt with "Grey Slate" emulsion mixed, watered down and applied in an almost random way. I did however try to keep the lighter paint away from the top of the tiles near the next row as this emphasises the overlap and gives a stronger shadow effect. Spending time tiling the roof with card proved to be a good investment when it came to painting.With the laser etched tiles more care is needed not to overpaint onto the next slate. With raised card picking out the edges was a lot easier and quicker to do with the same effect.
This next layer was straight from the tester pot grey slate again, I applied quickly overlapping the previous coat in an attempt to get a variety of shades on each troofing slate. Once more I avoided the shadow area at the top of the slate tile.
This picture shows the diverse way paint was applied. I often use the paintbrush sideways, instead of painting with the hairs on the brush, I go accross using the length of the brush. This sideways application gives a more natural looking random accidental efect and looks less contrieved.
|


This last picture shows 3 stages. I repeated the previous method using "Cool Slate" tester pot emulsion. Each time I apply a highlight, I cover less tiles and a smaller area on each. Applying highlights like this means each colour takes less time than the previous...great for motivation.
Once the slate was complete, I applied a lichen effect dabbing / stippling Vallejo German Orange Ochre (left over from when I attempted oak leaf pattern SS uniforms). The lichen effect was further enhanced with Vallejo "Ghost Grey", again this was a quick job as I was seeking a subtle aged / weathered effect.

I used grey primer paint to spray the windows and doors. Use a small blob of blue tac to hold the windows still when spraying to avoid blowing the pieces away. One set of windows I oversprayed black, another white. I then used a small amount of contact adhesive to bond the windows to some acetate (If I remember correctly this was from the front of a Christmas cracker box). I usually glue in the windows and then apply the acetate by gluing the window surround inside and sticking on a large piece, this avoids any glue being seen from the outside. On this occasion as both sides of the windows are to be seen, I had to take more care.
Look out for the next tutorial where the finishing touches will be applied to complete the kit.
Tutorial: Step by Step "Table Edge Terrace" Part 2 April 19, 2015 10:41
If you have just logged into the Charlie Foxtrot Models Blog, please read my "Tutorial part 1" to see how I reached this stage.

This picture shows the model with the roof complete and the walls textured. I bought a large aluminium turkey roasting dish (79p) and poured some in chinchilla dust; the deep sided dish will contain any spills. The chinchilla dust I bought from a local pet shop. A large 3kg bag was only a couple of pounds. I have textured many buildings yet the dish does not seem to be emptying. I use an old large paintbrush to coat one wall at a time in PVA. Draw out the glue so there are no runs or drips then press the building edge into the dust. The chinchilla dust is highly absorbent and sticks instantly with very little "drop off". Repeat for all walls. If you cannot press into the sand due to the roof overhang, sinply take a handful and pour it over. I carefully applied PVA with a smaller brush and then used the pour method to coat the dormers and chimneys. This now needs to be set aside to dry.
Note: If you miss a bit of wall, leave it to dry and patch in the gaps the next day. I learnt the hard way. If you try to touch up any gaps or areas of PVA that have dried too quickly, the chinchilla dust comes off and sticks to your brush. The more you dab, the worse it gets.

When fully dry, spray primer the model grey. For miniatures, I prefer a black undercoat yet for buildings a cheap grey car primer provides a good surface to paint on. I apply two coats, leaving it to fully dry between each.

I sprayed the inside of the building with primer. I have no plans to paint the inside of the building or to decorate in any way. If you see "Ruined House 1" in the shop, you can see the effects that can be achieved should you wish to go that way. I am under a time limit for this model and do not want to detract from the main part of the gaming table.
The focal point of the wargames table should be, I believe, where the action is. I want the village centre to be the "centre of attention" and the "Table Eedge Terrace" to be a back drop to this. While on this point, I see very limited value in painting the inside of buildings (unless they are ruined and open to view). For the brief few seconds it takes to place models inside and replace the roof, the time spent doing interior decorating has, in my opinion, little return. I prefer to spend the bulk of my time painting the rooftops. They are always in view and the closest part of the model to the gamer....more on this later!
I had toyed with doing Hollywood style scenery props front facade only yet this would look good but not add anything to the gameplay. This idea was dropped in favour of gameplay vs aesthetics balance.

| I masked the inside to avoid overspray into the buildings which I wanted to remain grey. I then gave the mode 2 light coats of white spray, not being too careful to get the colour even. This gave the muted off white / pale grey I was after. |

|
With the chinchilla dust coated and sealed with spray paint, I was then able to mask off the front (I used decorators frog tape) and hand painted cream from an emulsion tester pot. Please disregard the sneak preview of the soon to be released "Front yard" plain wall version. You are not meant to see this yet. I now need to let the emulsion dry before I can continue this project. Part 3 coming soon...... |
Tutorial: Step by Step "Table Edge Terrace" Part 1 April 17, 2015 14:02
This is going to be a diary style how I complete a kit to the standard you see on my website.
I have just released the "Table Edge Terrace" and I need to have it painted for the Exeter Legionary show in two weeks. As I have a lot of other terrain items to complete, I will be getting the effects I want, in rapid time using as many time saving techniques as I can. I assembled the kit as per the instructions, leaving off the chimneys, dormers, doors, windows and shutters. This took 15 minutes.

I then trimmed the corners off the dormers and chimneys to get a close fit to the roof. I used a small Stanley knife and then sanded the edge with an emery board. I prefer these to sandpaper as being more rigid, I do not round the edges off when I want them to be square.
Then I used quick drying polyfilla to cover the jonts and tag gaps. I also filled the chimneys and dormers at the same time. Approximate time to fill 10 minutes.

After 10 minutes, I gave the filler a light 5 minute sanding to smooth the walls ready for priming.

At this point I was going to spray and paint however I could not resist using my card tiles to texture the roof. I did this with the dormers off to save time "cutting in" gluing straight runs made for a quick job and the roof was complete in under an hour. There is very little waste when tiling the roof as any offcuts are used to start the next row.

Lining up the tiles was easy as I just followed the engraved lines. The card tiles are the same size as the engraved ones so you do not have to adjust the size. If you look to the left of the roof you will note I left a small overhang with the card. I plan on cutting this off when they are dry. This will save time on trying to line each strip up accurately.
When the roof was complete, I glued on the chimneys and dormers. I lined the dormers up using the tile edges as reference. I then placed a 12" ruler over the top to ensure all 3 dormers were even in height.


The dormer tiling was easy....if you follow these steps. Cut a straight edge with a full tile to your left. Cut the tile strip slightly over size after "offering it up". Place the tile edge on the outermost edge of the dormer roof then using a fingernail or pencil point crease the card into position. You will then pick up the correct slope to get a good fit to the roof. When you have this line, trim to size with scissors.
As you need 6 of this piece, DO NOT GLUE IT ON. Rather than make more work repeating the process, simply draw around the tile strip you already have. Glue in place and repeat for the next course of tiles. In the picture you will see my top rows of tiles. Once I cut the slope to fit the roof, I offered it up to the dormer and drew a pencil along the back to know where to cut. Again you do not need to be mega fussy here. Any gaps at the top will be covered by the plastic ridge tiles.
To complete the dormers and ridge tiles I took 60 minutes.

I cut the plastic angle pieces to approximately 10mm using a razor saw and a bench hook I designed with measurements on. The roof is just a matter of straight cuts while the dormer needs more work. I glued on the outer one so I did not have any fiddly small bits on the edge. I then trimmed a tile with a Stanley knife to fit the roof end. I infilled the last one by either adjusting the gaps between the tiles or trimming to fit. A tiny amount of quick drying polyfilla on the tip of an old paintbrush was used to fill any minute gaps. I used the same wet paintbrush to smooth any raised polyfilla lumps.
This now needs to be set aside to dry.
More on this project will follow .......
New Release: "Table Edge Terrace" French Version April 17, 2015 11:52
Having laid out my table for the rapidly approaching Exeter Legionary show, I thought there was something missing. All placed buildings were neatly away fron the table edge. To add an illusion of a larger built up area I took "The Terrace" and with a few adjstments came up with this. I saw this as a good "game play" piece with models placed inside during deployment. I will be doing a step by step how I complete this kit "as I go along" please revisit and check my progress.


New Release: "The Terrace" April 12, 2015 16:46
This week sees the release of a building I have had in the pipeline for some time. I wanted to release two versions of this building together with front & back yards. The French version has a steeply pitched roof with dormers and the windows have shutters. The British version was designed for alternative history games with Dad's Army types fighting German Paras or "A Very British Civil War". The British version has a lower pitched roof and dormers and shutters have been removed. For more pictures of all 4 models, please visit the shop. The moss patches are Mini Natur self adhesive moss. Peel & stick on to break up that grey expanse. Expensive yet you only use a few, I am sure one pack would be enough for a complete village so good value for money in the long run.

|
The model was a very quick paint job. I sprayed the middle section black. I then sprayed all the model grey primer. Next, I masked off the centre house and sprayed over the grey with white primer. as all 3 cans are in my "always keep in stock" I did not have to go out and buy anything. I sprayed the white lightly on the "scruffy end" and sprayed a second coat on the "tidy end". A quick brown shade wash and a very watered down black shade wash the walls were complete. I sprayed the windows at the same time as the walls. The only one that saw a paintbrush for base coating was the blue. The roof was painted dark greay emulsion from a tester pot and the progressively lighter patches of emulsion were added; again from tester pots. To speed up the process, no paint was mixed. A few dabs of Vallejo German Orange Ochre and Ghost Grey were added for the weathered aged lichen covered look I like.
|
|
I had fun with the back yards, emptying my bases decorative scenics box. The walls were spray painted "red oxide" primer. A quick highlight was applied from yet another tester pot of emulsion. I wish I had seen the red oxide primer before I painted trhe "Georgian House"...it saves so much time. The back yard walls are deliberately tall to block line of sight. The party fences can be seen over, giving some tactical variety. |
|
|


| With the addition of the front and back yards, this model has a large footprint and will form the centre of the table. I have visions of placing this opposite the row of 4 shops. Look out for this at Exeter Legionary show. Two of my gaming mates, Paul Buller & Big Ron Leacy are playing a demo Bolt Action game at the show, using my terrain. Both chaps are very accomplished painters so it should be quite a spectacle. |
| On the workbench this week is a complex roof for a large building, once more this will be suitable and customisable for both French and British scenarios. I have just cut the walls and window detail ....I always get apprehensive at this point hoping that the many hours on the computer designing pay off and it fits together! Watch this space. |
New Release "Ruined House 3" 28mm Laser cut building April 8, 2015 14:28
Packaging and instructions are now complete and this model is now available in the shop. I have added a set of planked "Z" bar doors to cover a wider time frame.


On the workbench April 3, 2015 12:28
It has been a busy week, this website was launched and within 24 hours I had my first online order. Thanks Barrie from Tazmania, I have posted your models and put in a small freebie for you!
I had a large acrylic order arrive from my supplier so look out for new templates and tokens soon. First up are a set of 10 black acrylic "Skull Tokens". These can be used over a number of gaming systems. Considering they are very light in weight they are unlikely to inflate your postal charges.
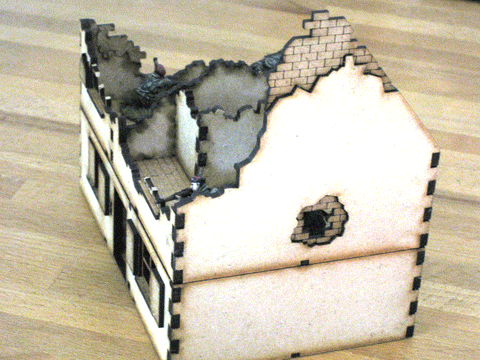
When proof reading my descriptions etc, November Foxtrot (the wife Nik) asked if I had left off "Ruined House 3" as I had not listed it. The reason for this is that I had produced the model over a year ago and was not happy, there was something missing; it just didn't look right. A few people asked to buy the original at the Plymouth PAW show in February but I had not gone into production with it. This week I reviewed the computer files again and thought a quick fix was in order.
This did not turn out to be the case and a major revamp took place until I was happy with the result. The following pictures are Mark 2 "Ruined House 3". Before this can be listed in the shop, I need to draw a packaging header and an instruction sheet. I also plan to move the hole in the wall at the raised gable end. All was fine on the positioning until I got the bright idea of having more exposed brickwork. This made the hole lower and only kneeling models can fire out.
Any other improvements are gratefully recieved......for example, I envisiged the building hit from a tank HE round or two. I did the stairwell slightly higher so the trajectory looks right. Have I over thought this? Does it need to be lower to see the staircase better or is having some total block of line of sight a better payoff? Looking forward to comments and suggestions...


For the coming week I will be finishing the painting of a large model with a footprint of almost a square foot. Watch this space...
Happy Easter,
cheers Colin