To accompany the instructions what follows is a photo diary and comments for the Spanish Windmill construction.
Assemble the door and glue to the base (pictured is the base from Kit A) once the door is sitting in it's position glue the doorstep and slide in: like posting a letter. Check it is sitting vertically and then glue in the two reinforcing and locating 3mm triangles. Set aside to dry.
Glue on the narrower 3mm think ring around the top lip of the tube then glue on the wider 3mm thick ring to cover this and the tube top edge. DO NOT glue the card to the base yet.
Later, after you have textured the walls, you will need to place the card tube over the triangles and slide the structure to recess the door. The door should protrude approximately 1mm. This lip is to ensure a sharp and robust edge to plaster up to. This is a little out of sequence but easier to see the method without the plaster render in place. If the door recess is a little tight, enlarge with a file or nail emery board.
Cut the window frames from the card strips and set aside. Using tape, join the two strips to make one long length. After use this spacing strip can be recycled.
Align one window centrally above the door then tape in place. Next, glue each window to the card tube and remove the spacing strip.
Cut the large single window from the frame and tape the frame above the door.
Glue on the window then remove and recycle the card frame.
Remove two of the arms from the frame and glue into the recessed washer. Ensure they are lying flat to dry. Once dry, glue on the sails and repeat for the second pair. Although the pieces are durable, a spare set of "arms" are included in case of mishap. Use the diameter 4mm tube as a guide and glue 3mm washers to build up an MDF tube, please see the instructions as the image there is clearer than a photograph.
Following the "Pantile Tutorial" I marked with a pencil the position of my flour sacks (KitA only). I used an artists palette knife to coat the card tube with ready-mixed plaster. A thin coat was applied and fine sand glued onto bare patches. Successive thin layers were added to thicken the walls enough to cover the cardboard windows and protruding door frame. Avoid applying sand / grit where the flour sacks will fit.
At this stage, while the plaster is wet, take care to scrape out any filler from the window recesses. A little time spent now will save a lot later.
Using a sculpting tool, I scratched into some of the smoother plaster areas a rough stone pattern. Describe the bricks with the point of the tool and repeatedly go over scratching away filler between bricks. This is quite time consuming so just a few suggestions of stone were done.
When applying filler, it is best not to attempt total coverage all at once. I held onto the top rings and textured the lower part of the building. Once dry, I held the lower part to texture the top. As layers are applied, they can be sanded back if any lumps stick out too far. Apply a slight skim over the sand to bed it in.
Where I planned to place the flour sacks, I only skimmed the area with filler and sanded any high spots off before moving onto the next stage.
Following the steps at the start of this tutorial, I glued the card tube lower edge and the recess for the doorway. Next, I placed the tube over the triangles and slid the building along the base to align with the door. I then applied more glue around the seams both inside and out. When the glue is dry, apply filler around the base edge to fill any small cracks and fill any gaps around the doorway.
Cut bamboo into approx 3 x 25mm lengths and form a tepee structure using the 3 pre-drilled holes in the base as a guide. Cut and glue on 3 x bottom braces approx 23mm long.
Cut the long arm (initially over-length to 195mm) offer up to the aperture on the roof. Align the trajectory of the roof slope and slide the stay in place. Mark off the long bamboo arm then cut to size. Repeat the positioning and superglue to the tepee NOT THE ROOF.
Use the "Pantile Tutorial" to guide you with painting if needed. For my model I brought the colour up lighter than my other Pantile models, to an off white for the last highlight. I painted the millstones and flour sacks before gluing them on.
Once the painting was complete, I glued the flour sacks onto the base and wall and used a little filler to bring up the ground level and blend the sacks in. I glued the flat lying millstone at this stage.
After applying my usual basing method of sand / grit and allowing to dry, I painted the base and then glued on the millstone leaning against the wall followed by sticking on tufts.
In this example Tony from Debris of War has mounted the base onto a hill and applied a lot more scenic effects to make a really outstanding table centre piece.
With all kits, work on a flat surface, identify all parts and offer up pieces in a "dry run" before gluing with a woodwork quality PVA.
Once 3mm walls are glued together, while still wet, fix to base.
Glue this assembly to the left of the base.
One of the main roof pieces has a recess, this should be at the base of the roof and fits on the right when looking at the front of the main building.
Glue along the apex and fix strengthening triangles; then set aside to dry.
Glue in strengthening triangle close to the apex point. Ensure the triangle is NOT STICKING PROUD OF THE EDGES.
Run a generous bead of PVA along the inside seam, then set aside to dry.
Glue in windows and use edge of door to check they are square and aligned to the inside edge of the 3mm walls.
*** It is recommended that you paint the windows and the building before gluing the windows in place.
Fix window surrounds and lintels using engraved lines to assist positioning. The main brick window surrounds OVERLAP the 3mm wall by 2mm to cover the join when the roof is in place.
Glue on all surface detail, doors and door canopy.
Glue in spacer to support lintels on the three large roof ends.
Glue in tabs to secure and locate roof section.
Use small 2mm spacers when gluing on fascias. DO NOT GLUE in place and remove once the fascias are dry.
The entrance porch on the right has a separate roof. The main roof can be glued together or left as individual sections as required. Plastic half round strip is included in the kit to be used as capping tiles. The plastic should be cut into approximately 10mm pieces and glued to the ridges to hide the seams.
The "New World Tavern" is a large kit which has many components. Each part has been designed to be user friendly in assembly. The following steps may assist those who need more info than the A4 instructions included with the kit.
By following the instruction sheet it will get you to this stage. I worked on a flat surface and used full strength wood quality PVA.
You will note that I have left off lots of pieces that would make the painting more difficult.
As this is a large centrepiece I really wanted to present this model at its best. I used 3 sheets of "Roof Tile 2" (available on this site) together with the capping card tiles (supplied with the kit). Leaving the bottom row as engraved roof shingles, I started one row up and used PVA to glue on the tiles. I used a cutting mat and a craft knife but being thin card, scissors would also do the job.
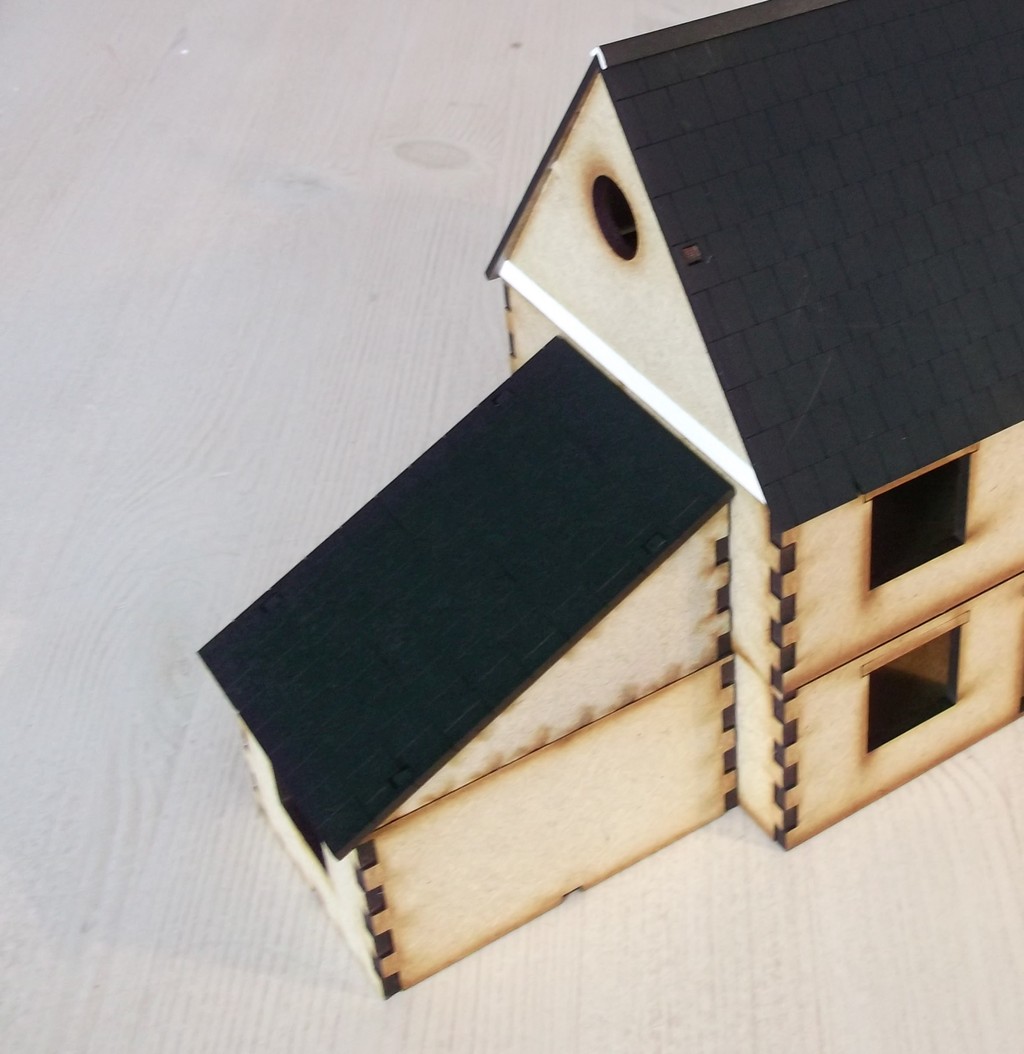
I have left the dormer roof off at this point as I want to do more work on them in sequence.
Take care with the two smaller roof sections to ensure you are tiling from the bottom to the top.
Add tiles to the half hipped roof sections and trim off once try. Using a craft knife with the blade extended (more on this later) hold the flat of the blade along the roof and gently cut toward the roof, pressing the tile to the MDF. This will prevent the tile lifting.
I completed the roof tiles (the two smaller roof sections are not glued in place but tiled separately) and then spray primed grey. I then lightly spray primed areas that were to be white in my final colour scheme. The grey undercoat will act as shading. At this point, I glued together the steps and then used blu tac to temporarily stick the remaining smaller pieces to some cardboard. This will prevent the smaller parts moving with the force of the spray. If you are spraying shutters and doors, spray at a low angle 45 degrees or less to retain the black engraved detail lines.
If you plan on skipping the optional roof tiles, the dormers will look like this. The roof comes with engraved tiles to paint as standard.
I painted behind the window black and the planked walls with tester-pot emulsion, leaving the spray primed window white. Using an all purpose glue (UHU) I glued in a piece of blister packaging for glazing before gluing on the dormer roof triangle end piece. This was then followed by the larger right hand side (see note below) as shown. After the final piece is glued in, allow to dry before filling with polyfilla or greenstuff. This is to ensure that the card tiling is easier to do.
Take a piece of dormer roof and make a card template ( I used a cornflake packet). The template can then be used to take the guesswork out of cutting the roof tiles to fit the sloping roof.
When tiling the dormers, do one flat side at a time and trim to fit before tiling the triangular sloping face.
By adding the middle tiles last it is easier to align the tiles to the existing rows on the dormer roof sides. Again, cut and glue on oversized and trim once dry.
Extend the blade and use the sloping dormer roof as a guide. Push the blade carefully towards the building to cut each row of tiles in turn.
With the roof tiles complete, I gave the kit a basecoat. I used Johnstones "English Trifle" emulsion for the walls, Games Workshop Teracotta for the brickwork and Americana "Bittersweet Chocolate" for the wood and roof shingles. (note the side roof is still not glued in pace)
After base coating, I did a pale yellow highlight to the lower edge of each "plank" using Dulux "Vanilla Sundae" tester pot. I drybrushed the roof and picked out the planks on the base by adding Vallejo Beasty Brown to the base coat before using a light pure Beasty Brown. Games Workshop "Dawnstone" grey was used to provide an extreme highlight which was toned down with GW Agrax Earthshade where I applied it too heavily. For the brickwork I added a pale muted orange Dulux Emulsion "Sumatran Melody 2" (left over from the pantile paintjob) and picked out random bricks. A number of shades were used by differing the amount of highlight paint. After the highlights werer applied, I spray varnished the brickwork to provide a seal before applying Model Mates "Brick Joint Filler".
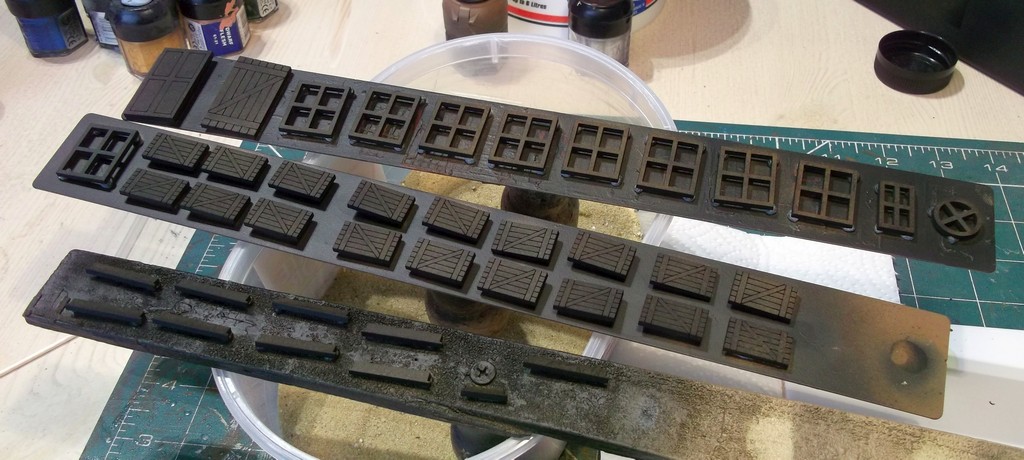
The following pieces were painted separately and added in this order.
Shutters, basement ventilation grilles, doors. All were sprayed grey and then oversprayed white.
I then glued in the rear supporting timbers for the long narrow roof. The timber supports are a single piece that too was sprayed grey and then white. Four triangular roof trusses slot into the main building and link onto the roof support pillars. Ensure the one engraved one showing the planks is on the left. One has a deeper notch to accommoadate the window frame. I spray primed the roof trusses grey and painted them yellow once in glued in place.The pre-tiled and pre-painted roof section was glued along the back.
I picked out the ironwork to the cellar doors and glued them in place. The doors fitting between the rear raised areas are a close fit. The paint needed sanding back using an emery board to ease the fitting.
I painted the four sets of steps and glued them in place after applying brick joint filler to the brickwork behind. I glued in place the handrails to the front steps.
The final optional extras were added. The resin barrel stack was painted and glued to the recess in the side wall. I used an epoxy resin (a multi purpose glue would also have bonded the resin to the wall). A single barrel was added to the rear for further effect and to strengthen the Tavern theme. Coupled with the "Hare Tavern" sign barrels, the two components are visually brought together.
Lastly I glued with a multi purpose glue (UHU or similar) blister packaging to the inside on the windows to get a glazed effect.
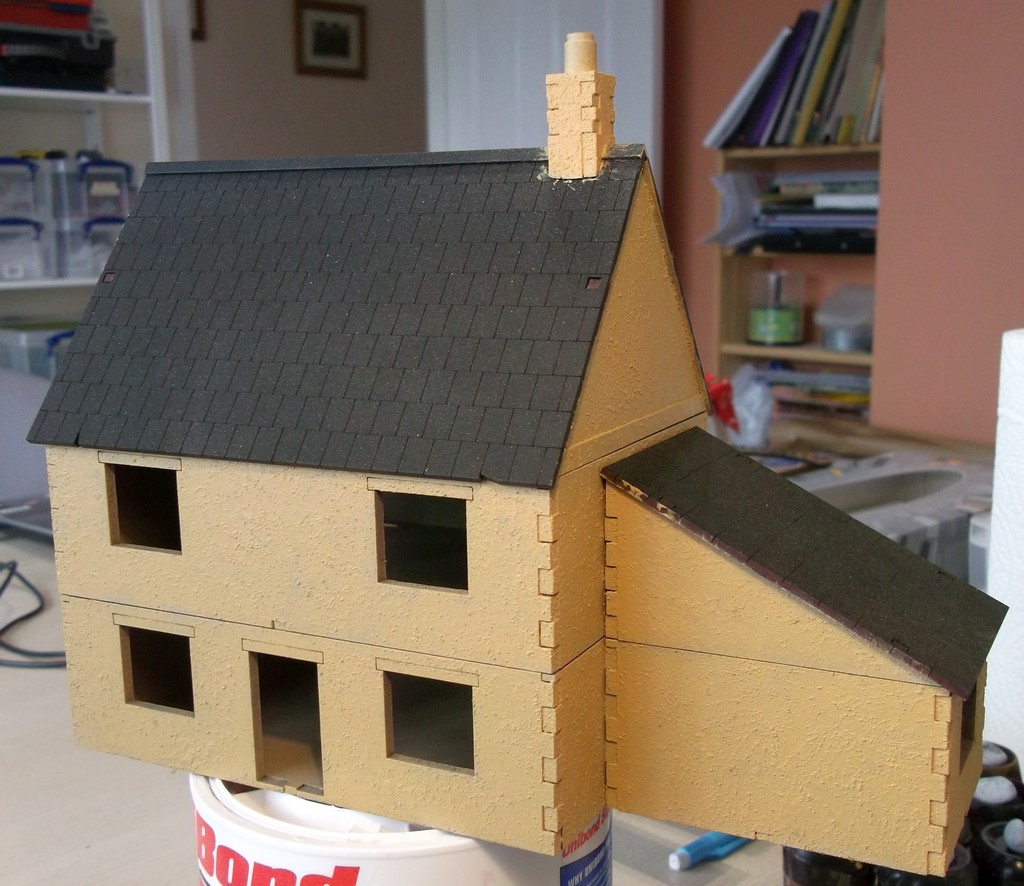
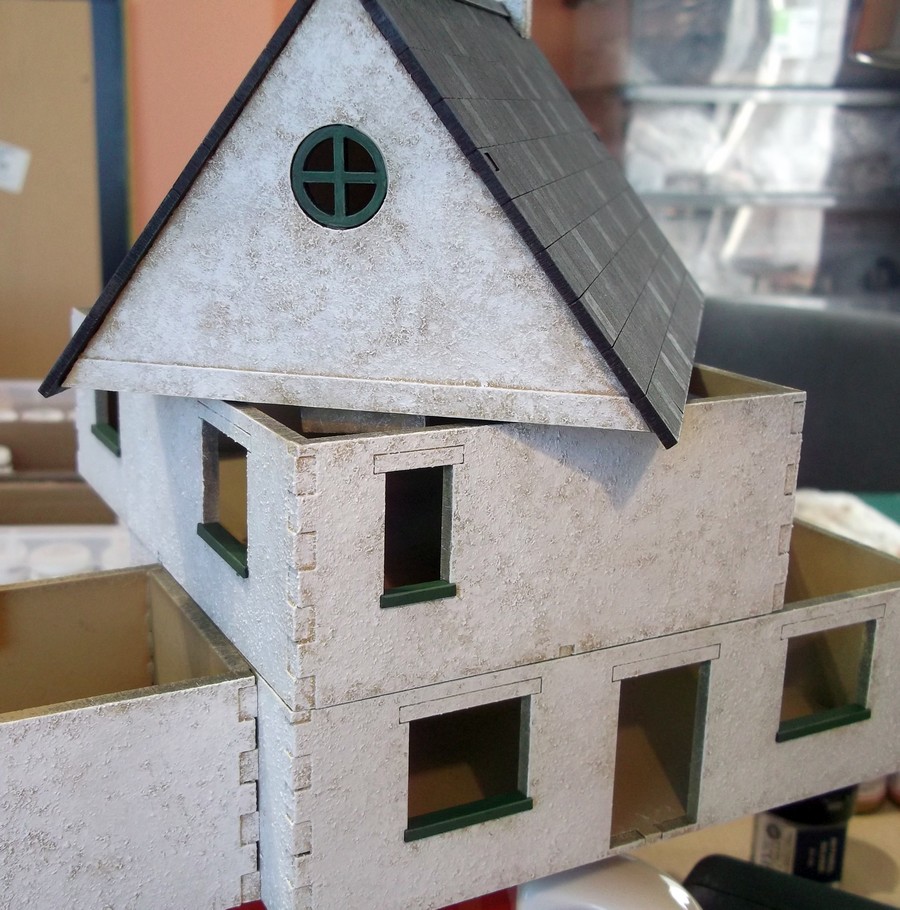
For this tutorial, I would like to walk you through step by step on how I achieved the "rough cast" weathered look of the "Pantile House 1". This model is the first in a range of themed kits. Having resin components and very textured walls: I took a different approach from my Eastern Front or Normandy buildings.
From the following picture you can see the resin roof & chimney stack. Further resin components are to the side and rear of the kit. An MDF capping stone and a plastic component completes the chimney assembly.
First, I glued the walls to the floors and, once dry, glued in the thickening 3mm inner walls to give real depth to the structure. I then glued on the blacony, door arch, and window sills. I left off the windows and doors to make texturing and painting easier. For this image, the doors and windows are held in place with clear tape.
Before I started texturing the walls, I took a craft knife and distressed the sills and the door surround. For the door surround, I reduced the thickness on a few selected "stones".
The resin roof needed slight filing to sit comfortably on the 1st floor. If sanding or filing resin or MDF, work in a well ventilated area or outdoors and avoid breathing in any dust.
Using a spatula, or thumb in my case; apply filler (I used quick drying polyfilla readymix) thinly in a random way so you do not have a pattern. I have now completed 4 buildings and have used 2/3 of a 99p tube of quick dry filler.
Do not aim for total coverage; leave some lower areas of bare wood showing through.
Where you left some bare exposed wood, coat with PVA and cover with fine sand. For the image above, I painted the kit and the sand looked too patchy. I went back with the polyfilla and blended over some of the sand to merge with the previous plolyfilla layer. The kit did not need painting at that point, I did it so you could see where I applied the second coat of filler.
I used an acrylic made by "Americana" called Honey Brown in the recesses of the filler and where I thought a bit of shade was needed.
Next I mixed Honey Brown with Crafter's acrylic Tan 50-50 mix and drybrushed with a large brush. I then used pure Tan followed by a light drybrush dusting of Americana acrylic Bleached Sand. To bring out the fine lines in the door surround and give a little shading under the balocny and below the windows a wash with Games Workshop Agrax Earthsade was applied.
The roof and chimney pot were base coated with a Dulux mixed testerpot emulsion "Sumatran Melody 2" and highlighted with a light drybrush of "Sumatran Melody 3". A final dusting with Bleached sand and a light wash of Agrax Earthshade finished the job.
The windows and doors were spray primed then hand painted with a mid brown. I used the mid-brown with a little grey to highlight followed by a wash of Agrax Earthshade to finish.
The windows were glued to clear "blister packaging" sheet using Unibond solvent free glue. Once dry, I used scissors to cut the window frames off the sheet and trim to fit. I then glued the frames in place using PVA. The curtain is a piece of paper that I painted in rough stripes using Wargames Foundry 3 shade Austrian White.
Having the majority of the model painted using drybrush and wash method, this kit was very quick to paint. With the windows and doors separate also speeded up getting the model "table ready".
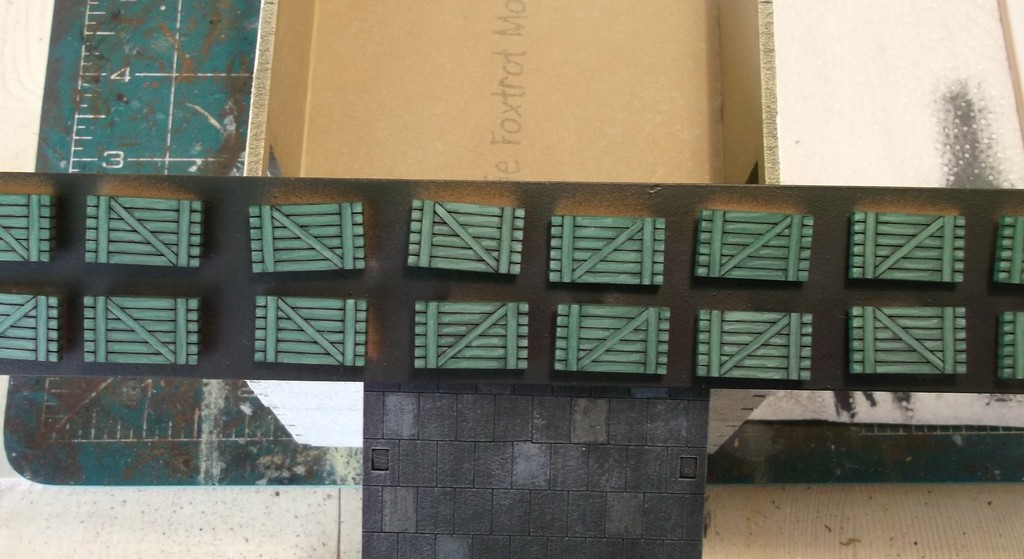
I have seen a number of modellers use "teddy bear fur" for thatching however results I have seen have been "mixed". The majority look like teddy bear fur even after combing out with PVA and painting. I have not tried that method but have been informed it is slow and very messy.
I saw a picture posted by Micheal Lundstedt from Umea, Sweden on Facebook. The picture was of a thatched Charlie Foxtrot Model. I had to make contact and ask him how he achieved the excellent result. The following tutorial has been put together by Micheal, showing how easy it is to get a superb outcome...once you know how!
Guest Tutorial: Creating a thatched roof for your 28mm
by Micheal Lundstedt.
When a received my Charlie Foxtrot Eastern Front buildings I decided that I wanted to add some extra flavour to them, namely thatched roofs. This tutorial will show you how I made these.
Material
In order to do this, you will need the following:
A towel.
I got a pack of small towels from the local supermarket for 2,5€. (£2.20)This pack will last forever. You want a towel with some structure as this will create the illusion of thatch.
Glue
I use standard wood glue (PVA). I believe I just about 1/3 of a bottle.
Paint
I just black spray primer and then a mix of citadel and Vallejo paints. This is all down to personal taste, however the primer is pretty important unless you really have some spare time to kill.
Making the roof
The first step is to cut the towel in strips, approximately 2cm wide. When you do this, you have to be careful about which way the small loops want to fall. Using a finger it’s easy to notice which way is easier. These loops should be pointing downwards (-ish) when you glue them to your roof.
Once you’ve cut a bunch of strips you can start applying glue to the roof. I use a bit of water to make the glue flow easier. Don’t forget to apply glue to the sides of the roof as well. Start from the bottom. You don’t have to worry unduly about the length of the strips at this point, but do make sure you press them down the edges of the roof as well.
When the first strip is in place it’s time for the second. Add more glue, and this time add some glue on top of the first strip as well. If you don’t water down the glue at this point it’s really difficult. You don’t have to be too careful though, as we will cover the entire roof in glue later on. Place the second strip in such way that it overlaps the first one by about 5mm.
Now, just keep on working your way up to the top of the roof. Once there, start from the bottom on the other side and repeat the procedure. Finally, add one strip that covers the top ridge of the roof and a little bit on both sides.
When this is finished, cut off the excess towel on the sides and then paint the entire roof with watered down glue. I make sure to paint the glue from the top downwards to make sure the loops are pointing in the right direction. After this is I leave the roof to dry completely.
Painting
Start by spray painting the entire building black. Once this is dry I used a chocolate brown paint to cover most of the black painting. I do this in a drybrushing way, without removing the excess paint from the brush. It will leave certain areas black, which is perfectly fine. Then I drybrush brighter and brighter tones, ending up with a light grey. This could of course be done in a myriad of ways, creating all sorts of end results. I like the darker, more worn look which I think fits the weathered look of the building.
Finished result:
Thanks Michael for an informative and well illustrated tutorial. This is certainly something I will try for myself. I am convinced that this is a better method than the teddy bear fur....that is unless other modellers want to mail in pics to change my mind.
Another review from Luke Fellows in his own inimitable style.
If you are not a follower of Luke's Facebook page, I highly recommend it. I recently used his black / brown wash idea and found it to work equally as well as propriatory brands. This one idea will save me so much!
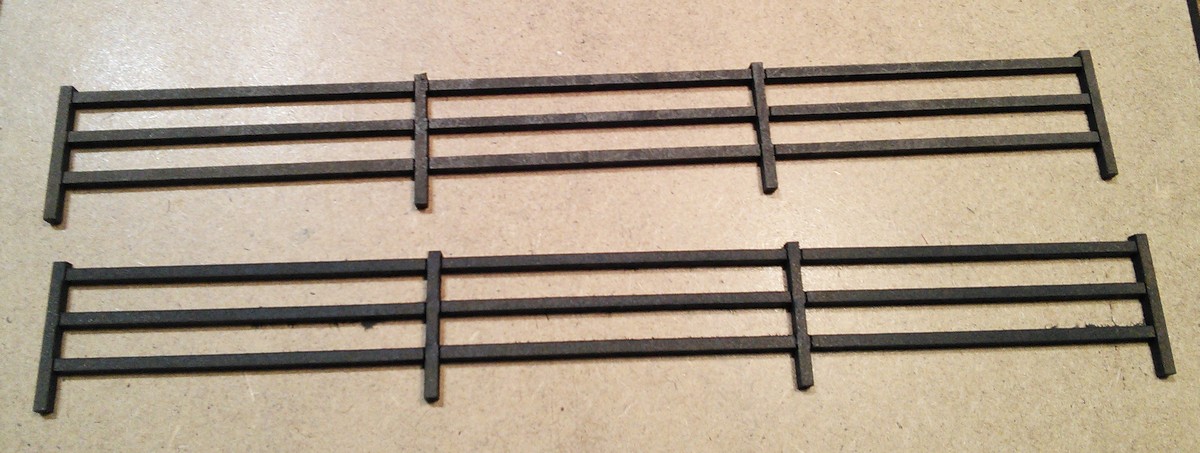
Matt, a regular blogger (http://thewargamestable.blogspot.co.uk/) and good mate has just completed a set or two of Charlie Foxtrot Models "Post & rail Fences" and was kind enough to let me lift this tutorial:
Step 1: Take the raw MDF and very lightly spray with matt black - just a dusting really so that some of the wood colour shows through. Hopefully this pic shows what I mean.
Step 2: Drybrush with any dark brown. I used VMC Leather Brown.
Step 3: Drybrush (very lightly!) with a light cream colour. Here I've used VMC Dark Sand.
That's it! All 12 sections took me less than an hour.
Step 4: Glue the fences to the bases.
The gate sections have subtly different bases and I like my gates to be slightly open as it makes them easier to spot at a glance.
Step 5: Apply sand and grit to suit your basing preferences.
Step 6: Paint the bases. I bought a tester pot of emulsion as it's way cheaper than using VMC etc. I think it was called 'coffee shop' but was fairly similar to GW Graveyard Earth.
Then I highlighted it up using my usual VMC Flat Earth, Gold Brown and Dark Sand colours.
Step 7: Finally, decorate them - I always really enjoy this bit - in fact I probably spent more time on the flock and foliage than the painting.
That's 6 feet of fencing done in double quick time.
Thanks Matt
Matt assisted me with my trade stand at Crusade Penarth and in lieu of salary, he chose a "Signal Box" kit....having seen early pictures, I cannot wait to see his step by step tutorial on that model. Matt thanks for your help and keep on blogging, your enthusiasm is infectious.
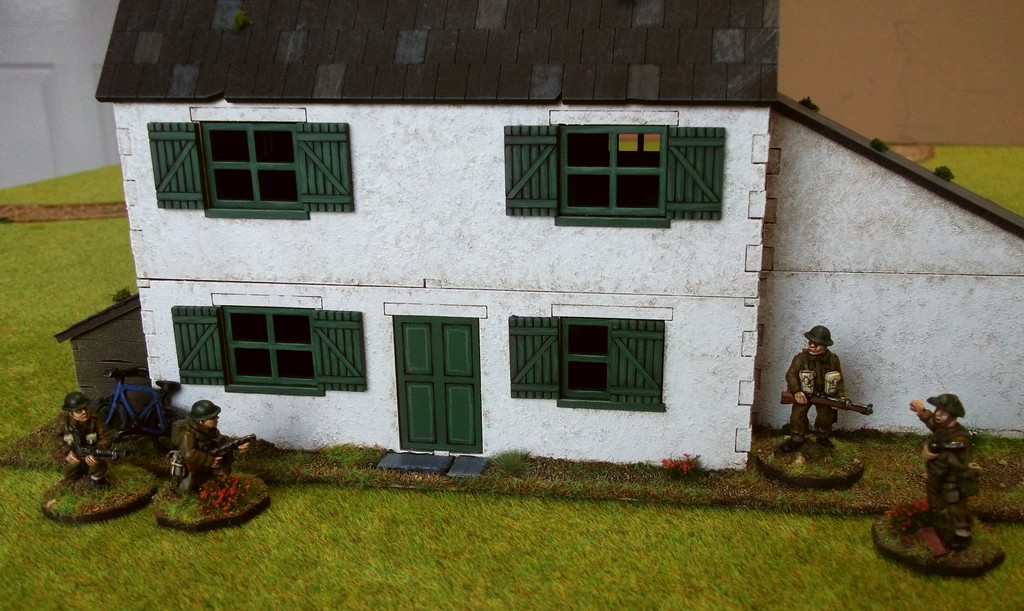
This post is all about taking the basic painted building and adding those little extras that will make it look a bit more interesting.
I think buildings always look better with a scenic base. If you're ordering from Charlie Foxtrot then drop Colin a line to ask for a custom base. It will add only a small extra cost and saves you the bother of cutting stuff up. Alas, I forgot to ask for a base so here I've used a piece of 2mm plasticard. Glue the building to it with a few dabs of your favourite all purpose glue.
The base is then covered in thinned PVA glue and a variety of grit/sand. You can see that in front of the door I've placed a couple of pieces of thin plasticard that I've carved to look like flagstones.
The sanded base can then be painted to match your other terrain or battlefield. My recipe is VMC Leather Brown base, then highlights of VMC Flat Earth, VMC Gold Brown and VMC Dark Sand. I use two different static grass colours, GW Scorched Grass and the lighter Noch meadow grass (ref 08310).
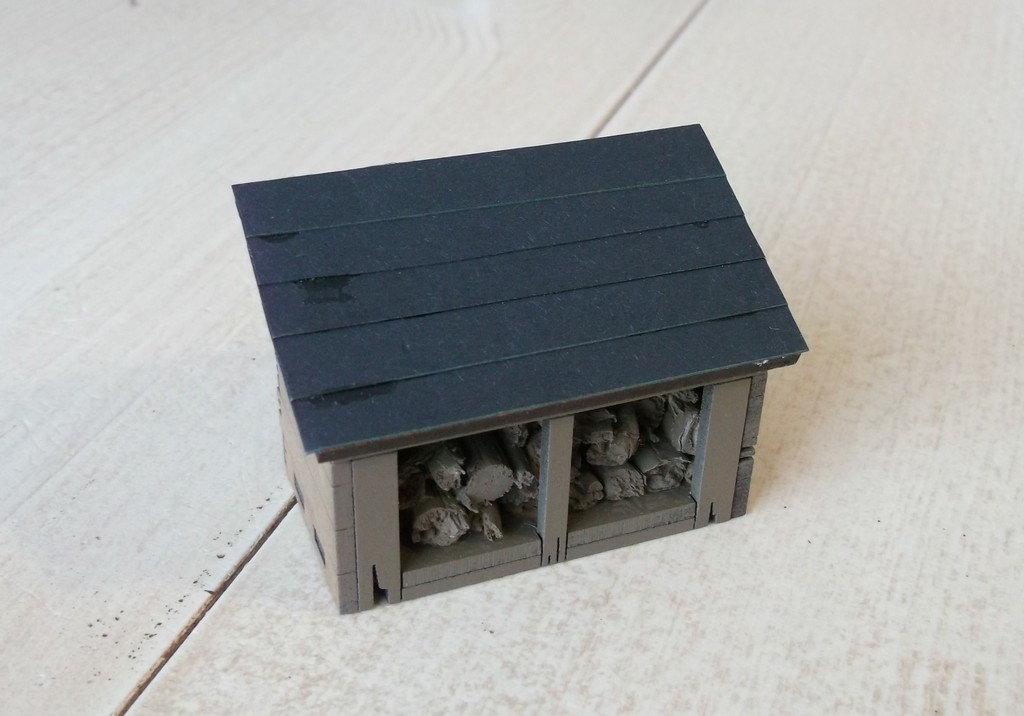
The log store! This was a fairly easy paint job. Spray mid brown then give the wood a solid base coat of any dark brown. I used Foundry Bay Brown Shade. Then dry brush with VMC Gold Brown and VMC Dark Sand. The logs got a heavier dry brush. The roof was painted black followed by dry brush highlights of the Foundry Slate Grey triad.
Here are the flag stones I mentioned earlier. Painted black followed by the Foundry Slate Grey triad. I've also added a few clumps of flower tufts here and there.
To give the model building that 'lived in' look it's good to add a few everyday items. Here's a bicycle from the bits box.
Buckets, barrels, logs, ladders (CFM do nice ladders) all make good extras - just remember to leave enough space for your figures!
The log store - with an axe propped against it. The axe is a spare from the Gripping Beast Saxon Huscarls boxed set.
The roof sections have been 'enhanced' with some mould and lichen. Take a look at any real roof and you'll usually see yellow/orange mould, moss, bird droppings, etc.
In the CFM shop you can see some excellent examples of this on Colin's buildings. Here I've also added some soot to the chimney pot with black and grey.
Now for the interior ... some might consider this straying in to doll's house territory ... but a few little features are worth the effort I reckon. The downstairs has a fireplace plus some flooring from a (*cough*) doll's house makers blog.
Just print, cut to size and glue in with a glue stick (don't use a runny glue otherwise the paper wrinkles!).
Here are the components of the fireplace - some left over bits from an MDF 'sprue' and a bit of card. The 20x20mm square base is just for scale.
The upstairs has a similar, lighter wooden effect printed floor whilst the extension has a brick tile effect. I've resisted the urge to add furniture!
It would be easy to add wallpaper - there are plenty of (*cough*) doll's house sites that offer good examples for you to print, but that's beyond me! Don't even mention LED lighting and sound effects!! :-D
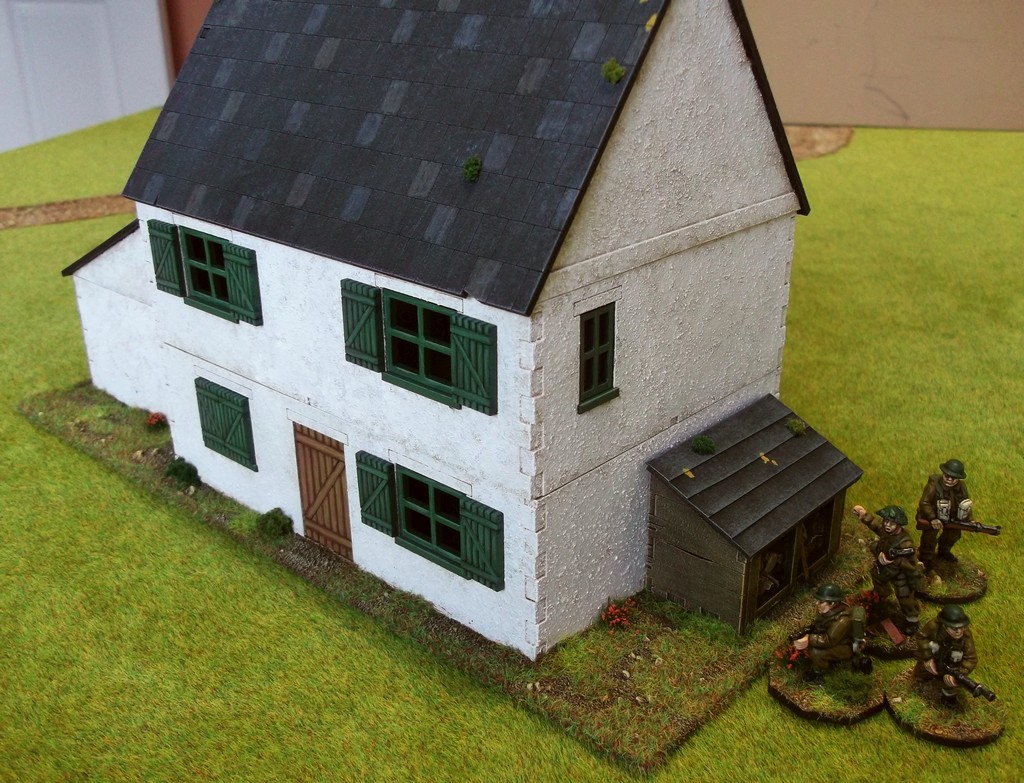
So here's the finished article.
I hope you'll agree that adding some of these extras will make your wargames buildings a bit special. After all, I expect you put heaps of effort in to painting your figures?
Good chum and expert modeller / painter Matt Owens-Smith posted this blog entry on his site www.wargamestableblogspot.co.uk
Once more, my thanks to Matt for giving permission to "pinch" wholesale. His step by step assembly and painting of the "Farmhouse" is well worth a read for modellers with any level of experience.
How to make MDF buildings - Part 2
This post is all about painting the recently constructed MDF building from Charlie Foxtrot Models to a decent gaming standard.
The building has been textured with a magnolia coloured masonry paint, then it's been lightly sprayed with Warlord Dunkelgelb, although any cream or light brown would suffice. You can see that the spray has speckled the roof but that's okay as it will need tidying up before it is painted anyway.
The first highlight has been applied using Foundry Base Sand shade 10A. It's been stippled on to the walls. (stipple = use a large, old brush and load with paint as if you were heavy dry-brushing, but instead of brushing, you tap the end of the brush on to the wall. If you're not sure then practice on a piece of card first.)
Next is VMC Dark Sand, again stippled to allow some of the colours beneath to show through - but only a little.
Finally I've applied white. Go easy here as white can be quite harsh; it's easy to add more if you prefer a lighter finish.
A close up of the white finish on the render (it's actually a little lighter for real!)
The doors, window frames and shutters are given a light dusting of black spray - just enough to prime the surface otherwise the 'raw' MDF really soaks up the paint. I use tiny dots of blu-tak to hold them in place.
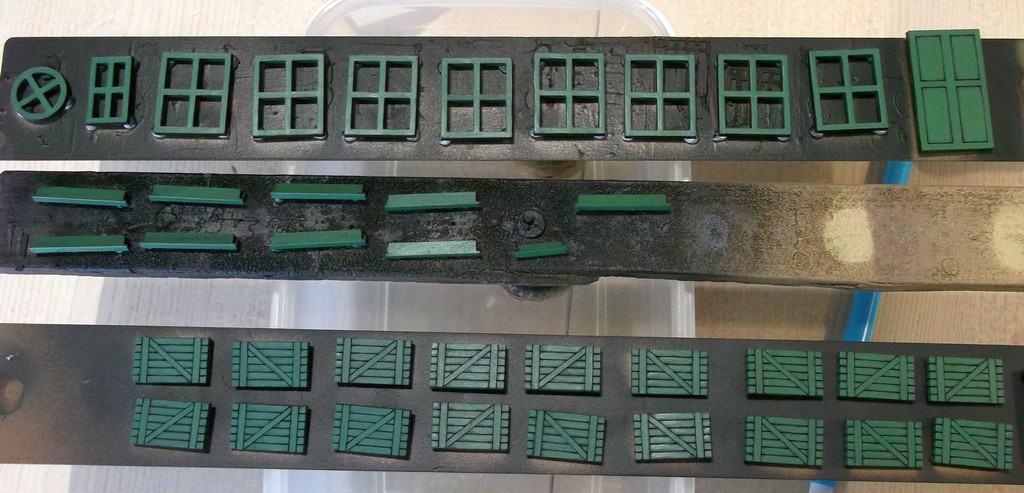
A base coat of Foundry Forest Green shade 26A, followed by the Mid colour 26B.
Then a final highlight with Forest Green Light 26C.
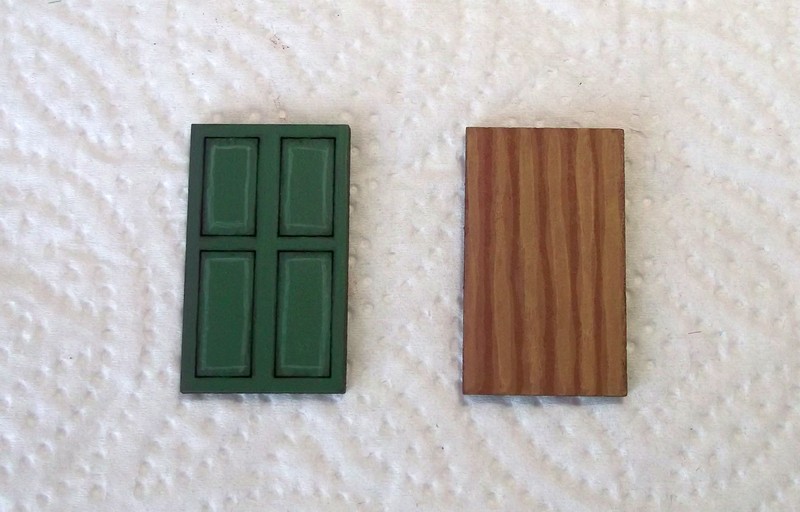
Now on to the doors - I've painted a series of fake panels or planks using the Foundry Spearshaft triad. The front door is painted in a similar style to the window frames and shutters
The back door (on the right) has a Z frame and again is painted using the Spearshaft triad.
The backs of the shutters will not be seen, whether the shutters are open or closed. The interior (i.e. the backs) of the window frames are given a basic mid brown colour.
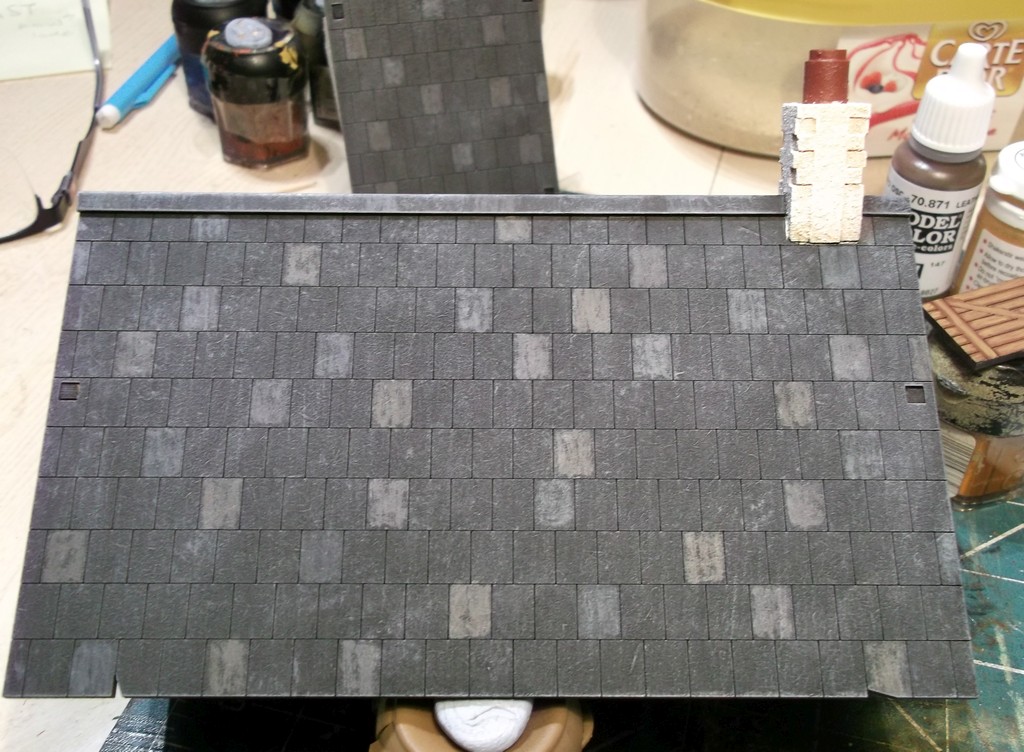
Now it's time to sort out the roof. There are various ways to paint the roof but here I present what I think is the quickest and easiest method for the standard MDF engraved tiles. Colin sells some brilliant tiling sheets in a variety of styles. Hopefully I'll do an example with some of those in the future.
The main roof - re-touched (by brush) to remove the speckles of the base colours - ready for the tiling effect. The chimney pot is painted in Foundry Brick Red shade 59A.
Select two or three suitable tile colours, e.g. natural looking greys. I've chosen the shade colour for Foundry Slate Grey 32A, Stone 57A and Granite 31A. Now simply select a colour and lightly 'colour in' a selection of tiles across the roof, about a dozen tiles per side, per colour is fine. It's a bit like dry-brushing but keep the paint within the edges of each tile. Then repeat for each of the other tile colours. Remember to do a few short sections of the ridge too.
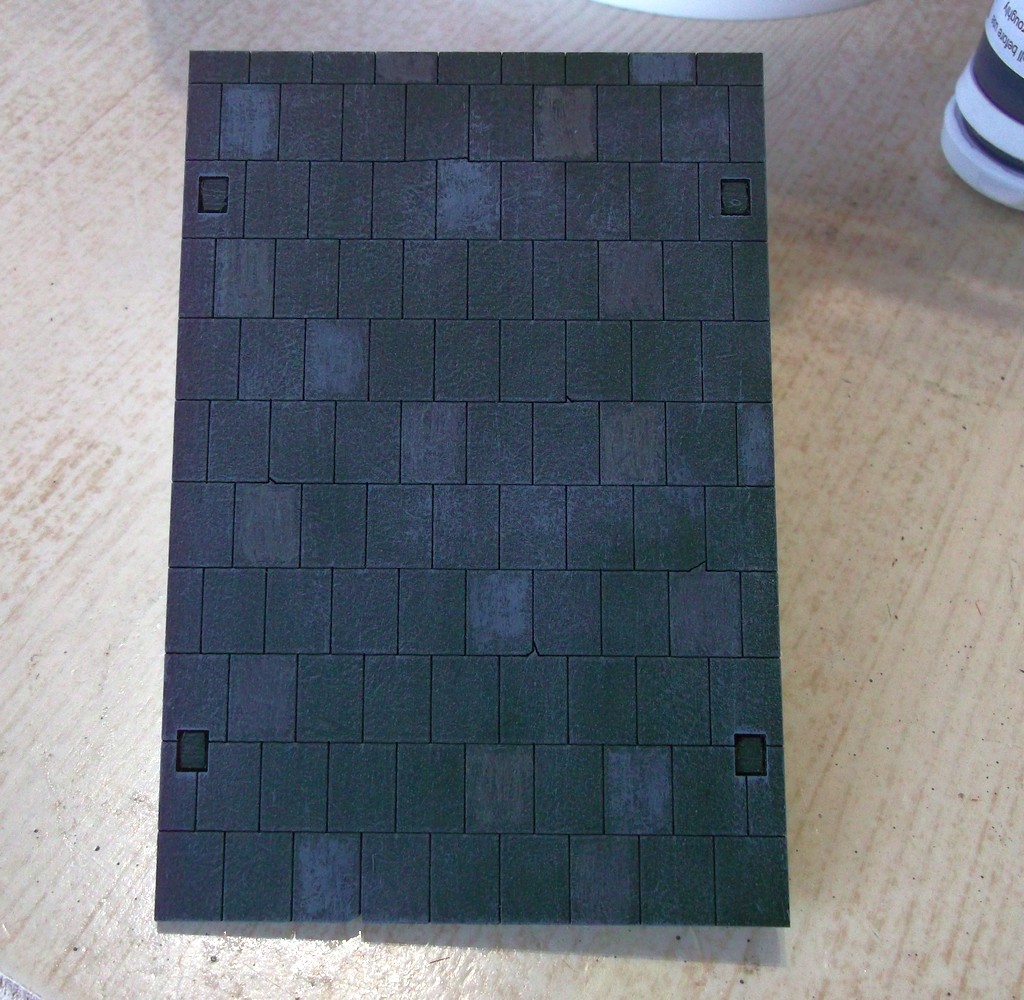
The final stage of tile painting is to take a mid grey colour, I used Foundry Slate Grey mid 32B, and very lightly (with a large, soft brush) apply a dry-brushed highlight to the entire roof. Do this VERY lightly as you can always apply a second or third highlight.
Here's the same effects applied to the smaller extension roof.
That's the painting pretty much complete for the basic model. Next is the final assembly. The pic below shows the window sills, and the loft window, glued in position (only some of the CFM range come with two part window frames). Let these dry fully before continuing.
Next glue in the frames, then glue the shutters around the windows.
Some Window Tips
Make sure you use a glue that dries completely clear as it's bound to leak a little around the frame edges.
Always dry fit the window frames before applying the glue just to make sure they fit properly. If not then trim the frame or aperture with a modelling knife.
Apply a small 'bead' of glue to the inside of the window aperture on the building, then let it go slightly tacky as that improves it's 'grab' ability. This means the window won't fall out when you let go!?
Shutters - the kit will have enough left and right shutters - make sure you fit them in matching pairs!
So, there you have it. The basic building is done and ready for battle!
Some more tips
Consider using DIY/hardware store paint tester pots as base coats for walls - much cheaper than Foundry, VMC, etc.
When applying the highlights go easy as you can always apply more paint but it's jolly tricky to remove it.
But why stop there? Part 3 will look at basing and finishing touches such as flooring, mantle pieces, etc. Oh, and I haven't forgotten the log store.
Good chum and expert modeller / painter Matt Owens-Smith posted this blog entry on his site www.wargamestableblogspot.co.uk
Thanks to Matt for giving permission to "pinch" wholesale.
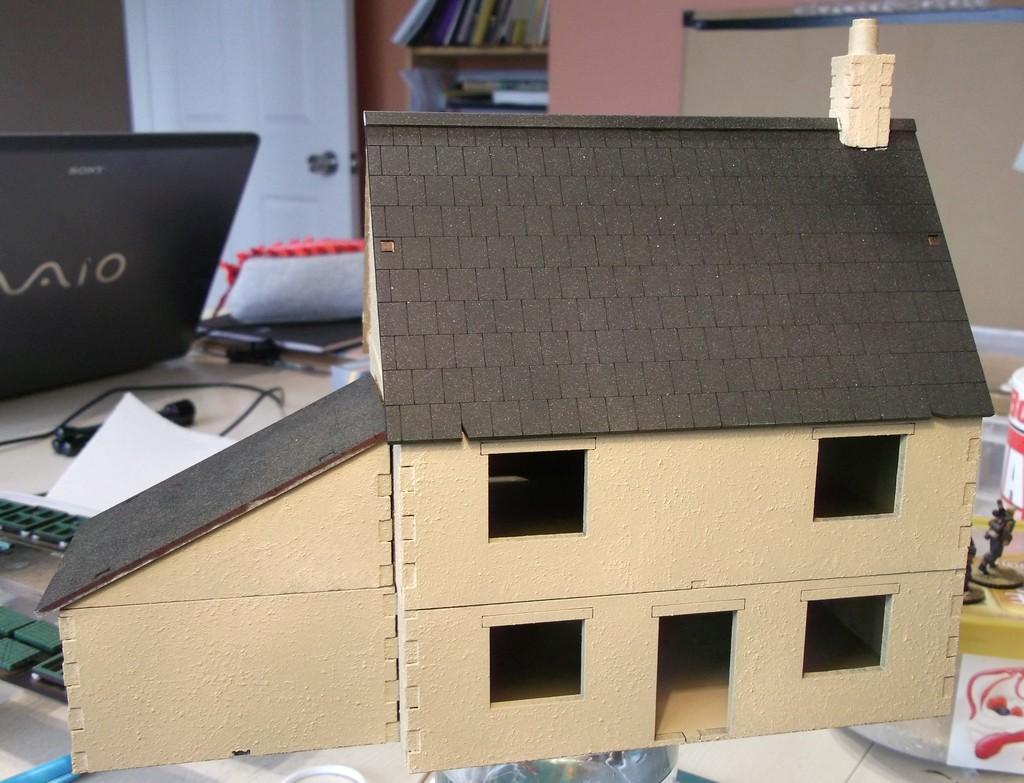
How to make MDF buildings - Part 1
This post aims to explain how to go about constructing MDF buildings, specifically those from Charlie Foxtrot Models. In subsequent posts I'll go on to look at how to paint them too.
I decided to do this after chatting to a few people at Colours. Some seemed a bit put off from making and painting them, but if you can build and paint figures ok then buildings should be no problem.
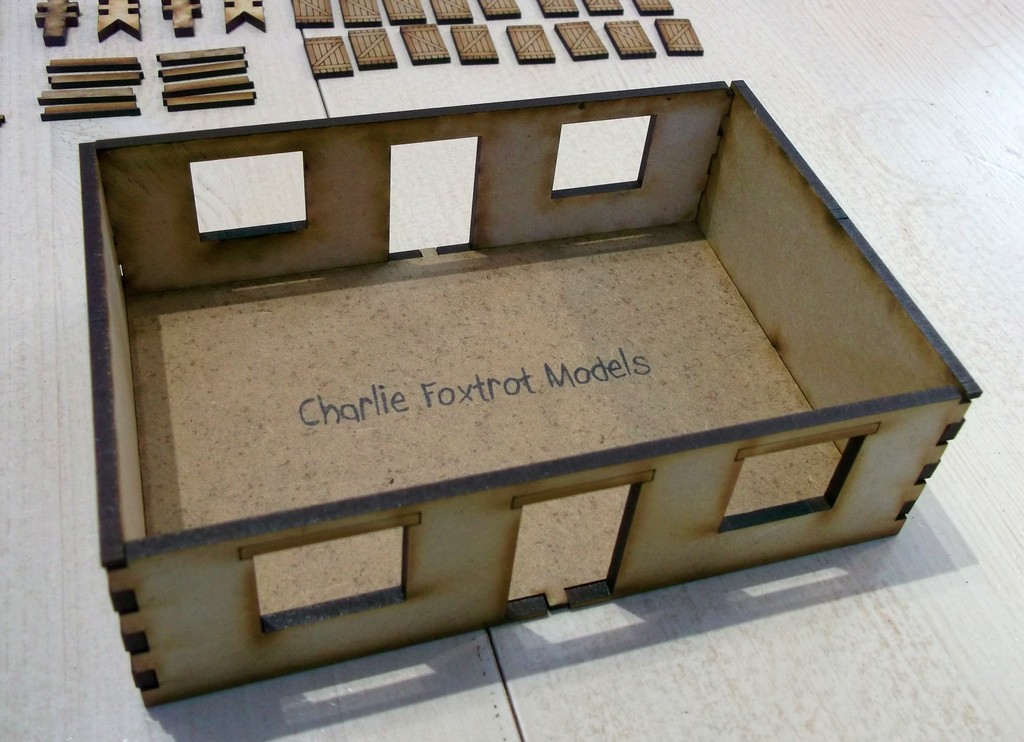
My first example will be one of Colin's lovely farmhouse kits. Here's the official picture.
Here are the components.
I usually begin by building the ground floor. A very important point to bear in mind is to always 'dry fit' any components before gluing. That is, check out how well they fit and how it looks by holding the pieces together - or maybe use some blu-tak. It's a good way to check that it all fits and looks right.
Here's the ground floor.
It all fits nicely, so it's time to get out the glue. Use good quality wood glue as it's stronger, doesn't shrink and dries clear. I normally use Evo-Stik Interior Wood Adhesive. Blob some on to a palette and then use a cocktail stick to apply the glue neatly. Less is more, so to speak, as the joins generally fit flush you really only need a small amount of glue. Wipe off any excess that seeps out of the joints using a damp tissue.
Another tip - Colin puts plenty of pictures of the finished article on his web site, usually from a variety of angles, so use those pics to help you figure out what goes where if you're not sure.
Roof: I suggest that you spray the tiled roof sections black or dark grey before you assemble them.
The upper floor also has some guide pieces to help it fit snugly on to the ground floor. They stop the upper floor sliding around too easily.
The tip here is to glue them in the corners (aligned to the edge of the base, inside the walls) then place the upper floor on top of the lower and give it a tiny wiggle. Then they'll fit neatly but with enough 'tolerance' to make it easy to lift on or off. The roof has similar pieces that glue on the inside of the gable ends.
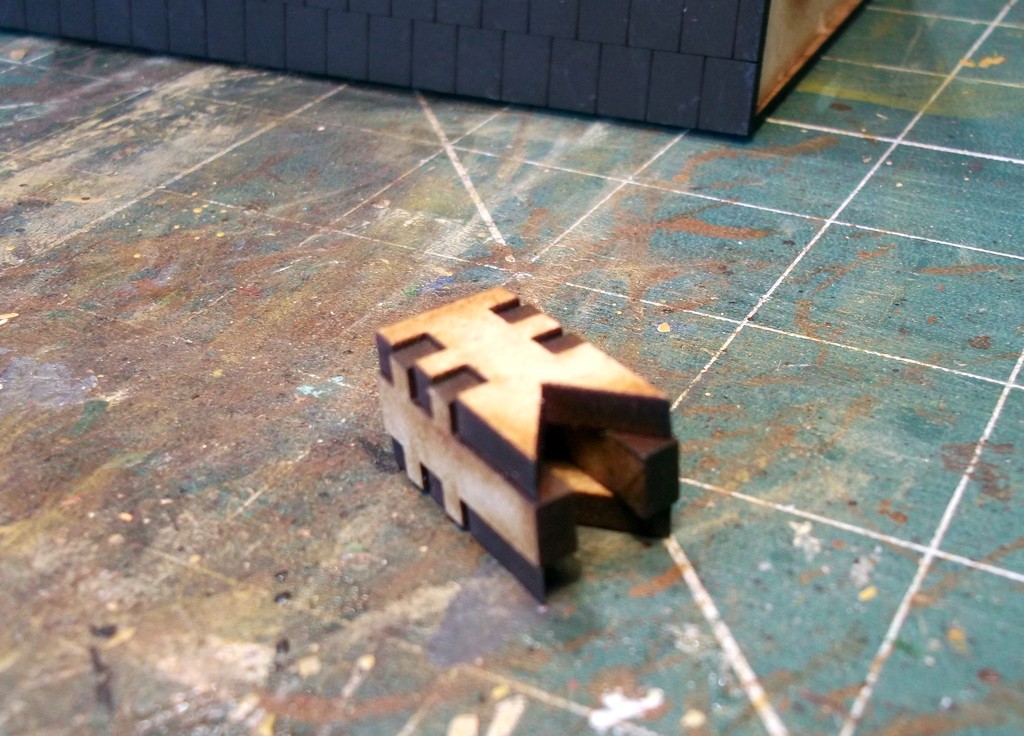
Chimney: The instructions show how these pieces fit together to make the chimney stack - hopefully you can see it's very straightforward. You'll need to shave some of the components to make them fit the angle of the roof.
The kit includes a length of plastic pipe that you can cut to make a chimney pot but I've found that cyclindrical lego 'bricks' give a good result for much less effort. Also included is a length of plastic strip to act as ridge tiles for the roof. I've glued on the chimney and trimmed the plastic to fit either side.
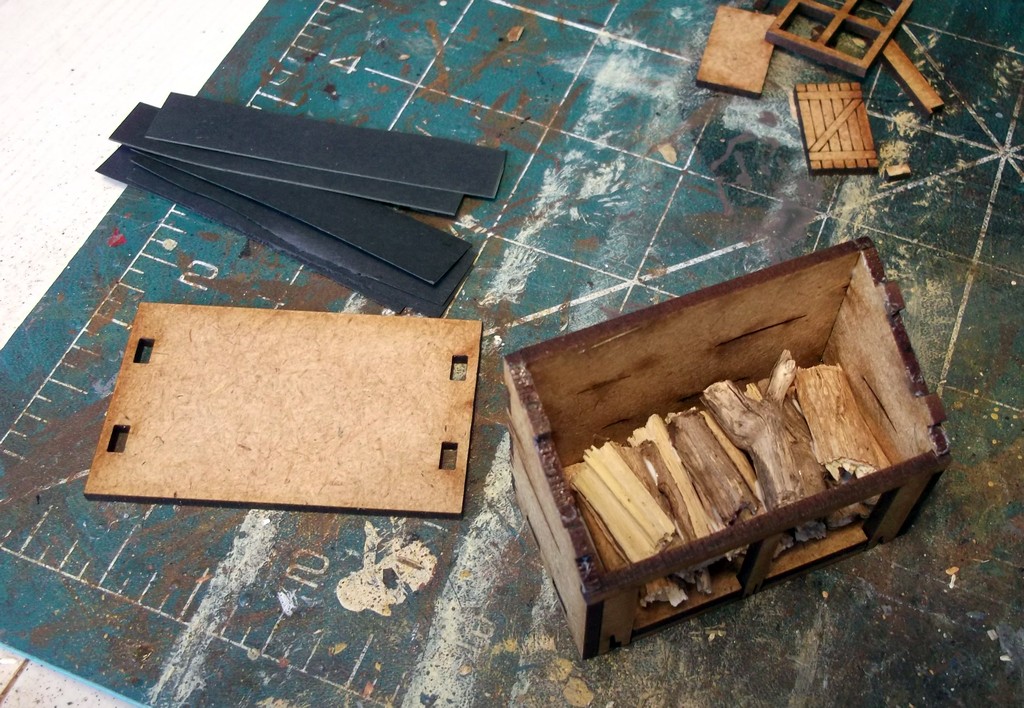
To add further interest I've built a CFM log store. A tip here is to leave off the roof so that you can glue 'logs' in place. The logs themselves are simply bits of dried twig snapped to the right length.
With the roof; made by overlapping strips of card.
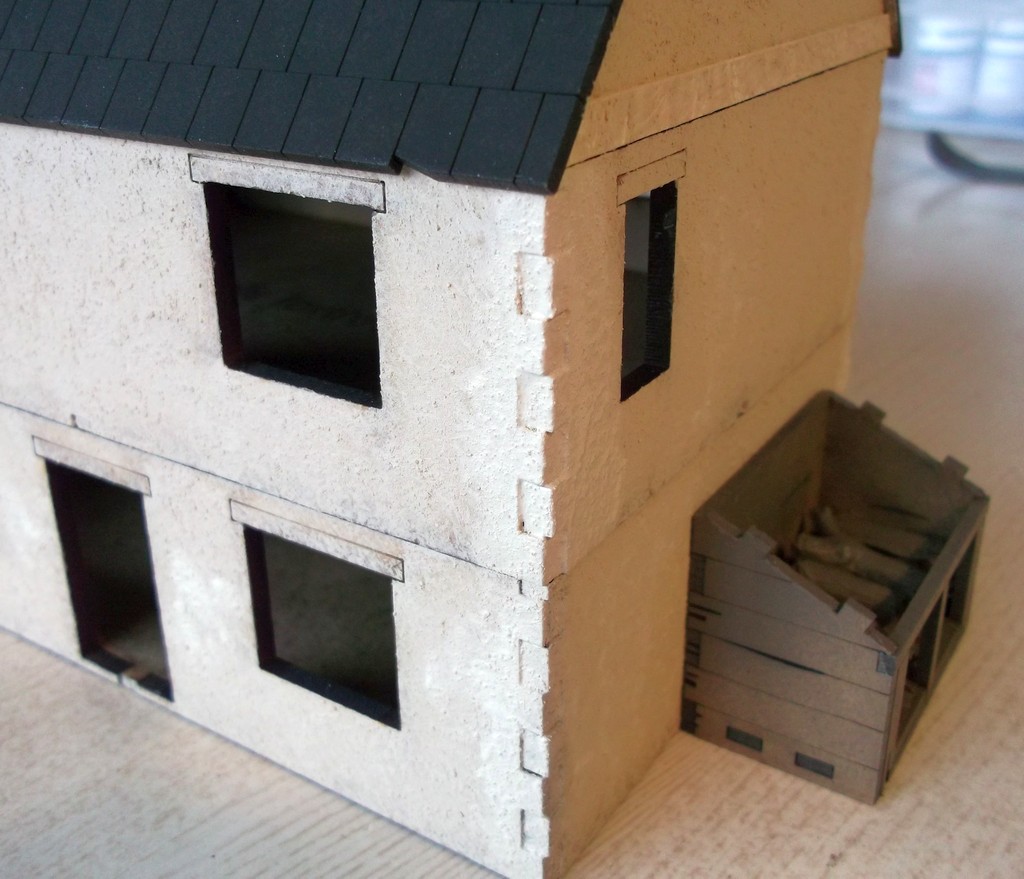
Fore even more variety I've added a CFM extension.
It's been built in exactly the same way as the main building.
The next stage is to apply the texture to give the walls a roungh, plastered or rendered appearance. I use cheap masonry paint - be sure to avoid the smooth types as you need a little grittiness to give the right texture. For extra texture you can mix in fine sand. Other gamers use something called Chinchilla Sand - basically a fine grained grit. (The lady in the local pet store gave me a very odd look when I asked for it, so I left. I'll stick to masonry paint!)
Warning! Make sure you keep all of the door and window apertures completely clear of any paint or texture otherwise it becomes a real bother to fit the doors and windows later!
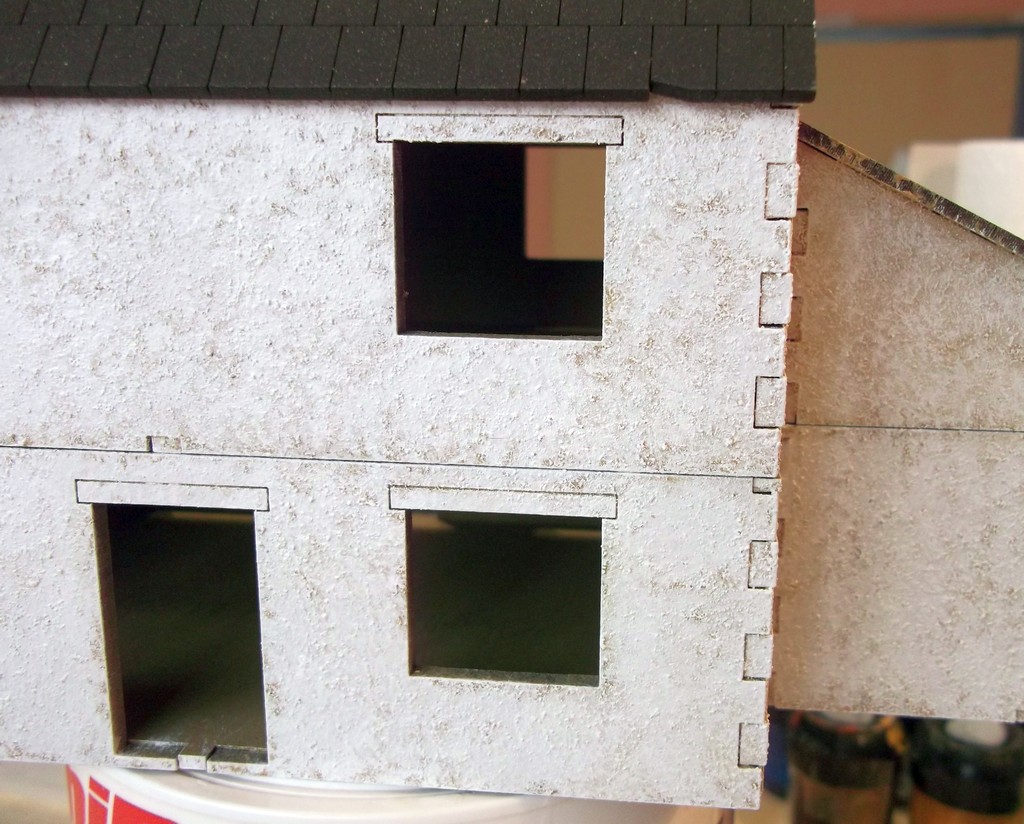
Some close up pictures of the texture.
Tip - keep a cocktail stick or similar sharp item to hand whilst texturing as it comes in handy for removing any texture from the etching above the window frames.
You'll see that the dovetailed corners give the impression of stone blocks. You could enhance this by adding your own blocks made from small squares or rectangles of thin card (I may try this out on another building) but for now I'm happy with the standard finish.
The textured building ready for some paint!
Summary of tips
Use good quality glue as it will have minimal shrinkage, be stronger and dry clear.
Dry fit the components. My Father was a carpenter and always said "measure twice, cut once"... in this case dry fit twice, then glue once!
Check that you have all the bits (Colin is very good - you'll often have a few extras!)
Follow the assembly instructions - if they're supplied. Yes I know most of us are blokes but the instructions are supplied for a reason!
Use the website pictures as a reference if you're not sure of any part of the build.
Spray things like roof sections before building.
Use lego bricks as chimney pots.
Buy a small pot of magnolia textured paint - a good base as many buildings will be off white or grey.
Keep any textured paint away from the window/door apertures.
I hope that's been a useful 'how to' for MDF buildings. In the next installments I'll start to look at how to paint them, complete the assembly and add the finishing touches.
After the release of my first batch of Eastern Front, Eastern European / Russian buildings which are predominately natural wood, I recieved a number of requests on how I achieved the painting effect.
Please note......ENSURE EACH LAYER OF PAINT / WASH IS FULLY DRY before going onto the next step. This will avoid dragging up foundation layers of paint and "muddying" the colours.
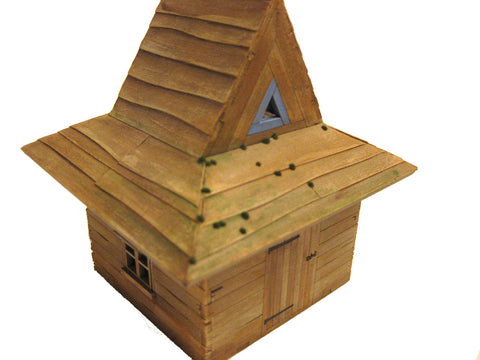
In this brief tutorial I will take you through step-by-step on how I completed painting the prepared "Hunter's Lodge" in just one hour.
Step 1: Assemble the kit according to the supplied instructions.
Step 2: Glue the waney edged cardboard tiles (supplied with the kit) to the roof. start at the bottom and work up towards the top. After each "plank" is glued coat with full strength PVA on the top to seal the cardboard. As you coat the PVA, it will start to dry, drag this along the length of the planks and this will provide grain texture when fully dry. Trim excess card with a craft knife when each side is dry.
Step 3: Using car primer, spray grey then overspray with Halfords Khaki matt paint.
Step 4: The hour's painting starts here! Using a wide brush, drybrush UPHILL at first to pick out the timber edges then along the planks with a light scrubbing motion (use an old brush for this). I used cheap Tan coloured acrylic from the Hobby shop called "Crafters Acrylic". Apply a lighter drybrush of Crafters Acrylic Bleached Sand (Bleached Bone would work just as well). At this stage the model will look too light and chalky.
Step 5: Apply a wash (I used Games Workshop Agrax Earthshade) to selected random wall planks, using the engraved lines as a guide. On the roof apply the wash towards the top of each plank to emphasise the depth of the planking. When applying washes in this manner, apply quickly and wipe any excess with a finger to blend. At this stage, it all looks too stark and stripey. This needs to be toned down to bring the colours together.
Step 6: With a very watery mix of medium brown acrylic (I used P3 Formula Bloodtracker Brown) liberally coat the whole model exept the light edges to the windows to retain their definition. As the paint drys, rub excess away with a finger, this action will reveal the lighter colours underneath. This rich brown wash unifies the colour and reduces the contrast yet provides depth.
Step 7: I watered down a very dark brown acrylic( in this example, I used Vallejo Charred Brown) to a milky consistency and selectively applied around the lower planks of the model, under the eaves, under the door hinges and window cills. A small amout of wash was also between the roof planks to give a little extra depth. I then used a pale blue to pick out the skylight frame followed by black on the door hinges and latch. A watery mix of medium green (in this case Vallejo Luftwaffe Green) was applied to areas to represent algae growing on shaded sections of the roof.
This mode l was complete in one hour. I did use a hairdryer to speed things up. For the other Eastern Front wooden buildings I painted them like a unit of troops and applied each process to each model in turn, when I got back to the first model it was dry enough to go onto the next stage.
Please do try this method on your Charlie Foxtrot Models builings. If you keep the paint thin and it does go wrong, it will be easy to overpaint and try again. Good luck.
I was so impressed with Ted's sea effect from the pictures he submitted for the customer gallery, that I just had to ask how it was done. Ted kindly offered to do a step by step tutorial as he kept the pictures as he went along. Even if you have no immediate plans to do a beach landing, you really have to admire the skill and end result ...feast your eyes on this:
SEASCAPES Colin produces some of the best war-games buildings available on the market today. I recently submitted some photographs for the customer gallery. Colin was interested in finding out how I had produced the beach landing scene and has asked me to provide a short tutorial. I have broken the process down into the following steps:- 1. RESEARCH In my opinion this is the key aspect to our hobby. We have all seen fantastically detailed war-game armies displayed on the table. Large amounts of research has been undertaken to get the kit and uniform details absolutely spot on before the first dob of paint hits the figure. If we are going to put all this effort into painting our miniature warriors and the buildings that they fight over, then it is only fitting that we deploy them in correspondingly accurate terrain. The Sea is a dynamic environment and is subject to a multitude of variables such as time, weather, sunlight etc. A beach on a spring morning will be remarkably different from an Autumn afternoon. Just like a photograph our war game terrain will be a snapshot in time. Its important that you study the environment that you wish to recreate. The sea is not always blue. It can range from various greys and greens. The colour varies with depth and wave heights vary with the wind. Its important that you pick a moment in time to model your masterpiece. If you don't have the sea nearby then the internet holds thousands of photos that can be used for inspiration. Follow the advice of Leonardo Da Vinci “Let nature be your teacher” 2. BASEBOARD Our war game club uses a modular system so that different tiles can be fitted together on our nine foot by five foot table. Construction is on MDF or ply board with polystyrene insulation board, hot wire cut, to represent hills and gullies etc. 3. BASIC PAINT JOB I used acrylic tube paint available from art stores. Four basic colours white, blue, green and black. Darken the blue to start painting the sea furthest from the beach. Then in blended bands start lightening the colour as it nears the beach. Add in stippled shades of green into the mid band to add depth and variation.
The contact point between the water and the land will have the largest amount of turbulence. So this needs to represent foam and churning bubbles. Later on in the process we will be using PVA. This dries clear and the underlying colours will show through into the solid PVA. Waves are formed by a combination of wind and the rising level of the beach. You will see that I have stippled light blue onto the flat board to represent the waves. This will show through the PVA to give an impression of depth. 4. PRACTICE & EXPERIMENT As the Military say “ Prior Planning and Preparation Prevents Pretty Poor Performance”. Get some small ply or mdf off cuts and practice the above technique until you get the impression that you want. These practice boards can be used again when we practice the PVA overlay techniques. 5. TOOLS & EQUIPMENT 1.Thick PVA such as Liquitex or Mod Podge. 2.Palette Knife. 3.Flat one inch paint brush 4.Cut down round stipple brush or an old round paint brush that you are about to throw away 5.Medium spoon. Kitchen desert spoon works well but don't tell the wife! 6. Tube of clear silicon sealer that is normally used as a bathroom caulking. Ensure that it is the type that says clear or translucent. I have tried different types they all do a similar job so go for the cheapest. 6. PVA WATER BASE
Use the thick PVA for this part. I tried both Liquitex and Mod Podge and they did a similar job. Liquitex is slightly better as it drys gloss. Both are available from art shops or on line. Use the palate knife to spread a thin layer ( 2 to 4 mm) across a section of your sea base board. Its best to do this in small sections say 20cm by 20 cm. Then take the spoon and tap it up and down on the spread PVA in a stippling motion. This will raise the PVA into small peaks. Experiment on your practice boards first before moving onto the main board Start out at sea and move towards the beach. You need to let this dry for a couple of days. It will be white when you first lay it down but will slowly dry clear. Some thicker parts may remain white if the atmosphere is damp. If you are really impatient then the wife's hair dryer can be put to good use but this normally requires a clandestine operation to obtain it.
7. WAVES Use the bathroom caulking best applied in lines with a caulking gun. place the lines of silicon over the white stippled pre painted sections of the baseboard. Use the one inch broad brush and drag the top of the silicon line backwards from the direction of the beach. This will give you a wave front with a trailing edge. Don't worry if you get brush stroke marks as when dry this adds to the illusion of movement. gently stipple the top of the wave with the cut down stipple brush. Once again use your practice boards until you get the desired effect. Vary your brush application to test out different techniques. HIGHLIGHT Use the one inch flat brush and with a very small amount of white paint dry brush the top of the waves. This is best done after the board gas dried for at least a week. The Silicone will be naturally white until it finally dries clear. Dont over do the highlight. At the waters edge use the stippling brush and white highlight to give the foam and bubbles effect. 8. VARNISH The PVA becomes clear by evaporation of the carrier medium. Observe the board over a number of days. The deeper whiteness gradually disappears however there comes a time when the balance between clear and white PVE gives a good impression of depth. If you want to stop the evaporation at that critical stage then spray the whole seascape with an acrylic gloss varnish. Once again available at good art stores or on line. Dont use enamel spray as you may get a reaction between the PVA and the varnish. Once again use your practice boards as a tester. 10.ENJOY THE VIEW The acrylic has proved to be remarkably robust. We have had no cracking or lifting. It only requires a wipe over with a damp cloth now and again to prevent dust from dulling the varnish. Many of our mini warriors have got their feet wet over this particular game tile and it has stood the test of time. If you have any specific questions on this technique then please contact me at tedmartin21@me.com. Happy gaming.
Ted, thank you for sharing this with Charlie Foxtrot blog readers.